Showing posts with label Spreads/Dips. Show all posts

Tuesday, May 27, 2014

Deviled Goodness (Vegan Deviled Eggs)

You can't have a holiday weekend without serving Vegan Deviled Eggs.   Seriously these are amazing!  My husband could not get over how much they tasted like the real deal, texture and everything.  As I mentioned in previous posts, I have never liked eggs (no matter how they were prepared)...but with one exception...my Mom's Deviled Eggs.  Everything she made tasted great and I think that she would love these too!

https://farm6.staticflickr.com/5160/14283368091_faaf1cbc15_b.jpg

This recipe is so simple, but you'll need a mold to create the cashew-agar base to hold the piped tofu mousse.  I used a ceramic deviled egg holder that I had in cabinet, but it was a little shallow.  I'm going to look on line and see if I can find a deeper base, but other than that they were absolutely perfect...beautiful and delicious.


This recipe makes about 36 portions so you will need more than one mold because the agar will solidify if you don't work quickly.  Or you can cut the tofu mouse recipe in half and pipe less.

Cashew Cream-Agar Egg Base:

1/2 cup cashew cream, (1/2 cup cashews blended in a high speed blender with 1-1/4 cup water.  If you don't have a high-speed blender then you will need to soak the cashews for about 4 hours and then strain through cheesecloth or a fine strainer.  You will not use all the cashew cream but it will keep in the refrigerator covered for up to five days.)
3/4 warm water
1 tsp Agar-Agar powder (I purchased my powder at an Asian market, for $2.99, but Whole Foods carries the agar flakes, but it will cost you about $9.00.  Also, if you use the flakes then you'll need to increase the amount to 1 Tbsp and boil it a little longer.
1/4-1/2 tsp Black Salt (found in an Indian or Asian market--it's actually pink and very salty.)

Method:  
  • Lightly oil mold with vegetable oil and set aside.  
  • Blend cashews with water and measure out a 1/2 cup of cashew cream.  Whisk in black salt and set aside.
  • Pour 3/4 cup water into a measuring cup and warm in the microwave for 30-40 seconds.  Whisk in agar-agar powder and then place back in the microwave for 1-2 minutes and let it boil.  
  • Place cashew cream into microwave for 30-40 seconds to warm and then whisk mixture into hot agar water making sure there are no lumps.
  • Skim off any bubbles off the top before pouring into mold, or pop bubbles with a toothpick.
  • Let mold sit on the counter for about 15 minutes before moving and placing in the refrigerator to chill for about one hour to harden completely.


Once hardened, using a small pairing knife, remove cashew-agar base and place on a plate.  Then using a small melon baller or spoon, scoop out a small portion of the base without breaking through the bottom.  Then pipe in the tofu mousse and chill for about an hour before serving.  Also, the agar will not melt or soften if these are left out for a little while at room temperature, but they are better served chilled.  So if you are serving a lot of people, I would serve a dozen at a time and keep the others chilled.

Tofu Mousse:
(You can cut the recipe in half if you are making less portions)

7.5 oz organic sprouted extra firm tofu (I used Wildwood--it comes it two sealed pouches, 7.5 oz each).
1/4 cup Follow Your Heart original organic Vegenaise
2 tsp spicy brown mustard
1 tsp turmeric powder
1/2 - 3/4 tsp black salt
1 tsp apple cider, or white wine vinegar

Method:
  • Drain tofu and press dry with paper towels and place in a food processor.
  • Add all ingredients except for black salt and blend until smooth and creamy.  You may need to add a little more Vegenaise to get the right texture.
  • Add black salt to taste and then pipe or spoon mousse into base.
  • Garnish with paprika and chives and chill for about one hour before serving.


Wednesday, February 1, 2012

Roasted Red Bell Pepper Hummus Sandwich

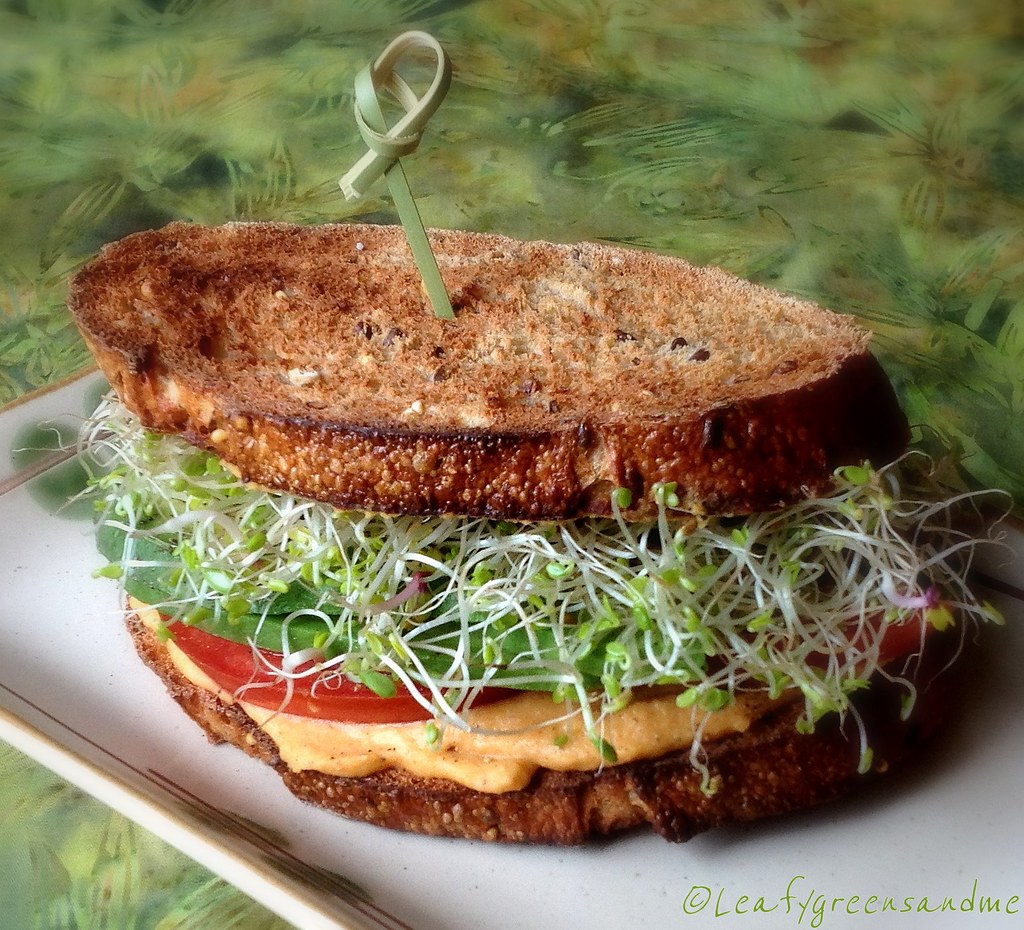
This is definitely my favorite sandwich (and my sister's too).  Every time I go back for a visit she always asks me to make my hummus and avocado sandwich.  How can something so easy be so delicious and healthy!  You can use a store bought hummus, but you might want to try making a batch of your own if you have a food processor or a high-speed blender.  Also the bread is key as well.  I used a dense whole wheat/grain bread and I sliced it thin.  When the bread is lightly toasted it provides just enough crunch against the creamy hummus and avocado.


Roasted Red Bell Pepper Hummus:

2 cups cooked chickpeas, drained (reserve liquid), patted dry with a paper towel
1 red bell pepper, roasted, skin removed
1 garlic clove, minced
2 tsp paprika
1 tsp garlic powder
1 tsp cumin powder
1/2 tsp cayenne pepper (more or less to taste)
2-3 tbsp tahini sauce/paste
Juice of 1 lemon (about 2 tbsp, or more or less to taste)
Salt and pepper to taste
2 tbsp bean cooking liquid if needed to thin hummus

Method:
  • Soak 3/4 cup chickpeas overnight, drain and cook in fresh filtered water until tender.  Let cool in liquid and chill until ready to use.
  • Preheat broiler to 500 degrees and roast bell pepper until charred, turning frequently for about 10 minutes.  Remove from oven and let cool.  Remove skin and seeks and pat dry with a paper towel.  
  • Add chickpeas, bell pepper, garlic clove, spices, tahini and lemon to a food processor or high-speed blender and blend until smooth.  If too thick add additional bean cooking liquid 1 tbsp at a time until desired consistency.
  • Season with salt and pepper and additional lemon juice if needed.
  • You can also add 1 tbsp extra virgin olive oil for additional flavor but I decided not to add it.
Other ingredients that I like to use on the sandwich are:  sliced cucumber, avocado, tomato, roasted bell pepper, sprouts, and baby spinach.  


    Monday, January 30, 2012

    Spicy Black Bean Tacos with Chipotle Crema

    These mini tacos are just too good!  My husband and I had like nine each for dinner on Friday night and then finished off the rest for lunch on Sunday.  I made the corn tortillas from scratch and you can really taste the freshness of the corn--so much better than the store bought version! 


    For the spicy black beans and brown basmati rice, I cooked both the rice and the beans with an adobo spice blend.  I make all my own spice blends and I made this quite some time ago.  I don't remember the exact recipe ratio but it contained:  paprika, ancho chili powder, garlic powder, onion powder, coriander powder, cayenne pepper, dried oregano and salt and pepper.  If you don't want to go through the trouble of making your own spice blend then you can just use 1-2 tbsp chili powder or a taco seasoning blend.  Also Mexican markets carry an already pre-made adobo spice blend, but I find it to be a little bland.

    I then made my own roasted tomato salsa, guacamole and a red and green cabbage salad with cilantro and lime juice.  I topped off the tacos with a cashew chipotle crema made with blended cashews, sun-dried tomato paste, paprika, garlic powder, chipotle powder, lime juice and salt and pepper.

    I could eat these everyday--so healthy and delicious! 

    Friday, January 27, 2012

    Homemade Corn Tortillas & Roasted Tomato Salsa

    I'm going to make this short and sweet because tonight is Mexican night and I absolutely can't wait to eat my mini tacos.  I made homemade corn tortillas (really simple and delish), as well as roasted tomato salsa.  I'll be serving my tacos topped with spicy Mexican rice, black beans, cabbage salad, guacamole, homemade salsa and chipotle crema!  I'll post photos and recipes tomorrow, along with my famous Pomegranate Margarita recipe.  Well at least it's famous in my household.  For the past two weeks I was away visiting my family in Maryland and my sister who doesn't drink alcohol at all was practically asking for margaritas every night...sorry Dana the truth is out!  And I think one is calling my name right now!


    Roasted Tomato Salsa 


    6-8 Roma tomatoes, roasted (see link)
    3-4 Roma tomatoes, blanched, skins removed and grated
    1 Jalapeno, roasted, skin and seeds removed
    1 tsp garlic powder
    1 tsp cumin powder
    1 Jalapeno, seeds removed and finely minced (about 2 tbsp)
    3 tbsp finely minced onion
    1-2 tbsp minced cilantro
    Juice of 1-2 limes (depending on size)
    Kosher salt and black pepper to taste

    Method
    • Preheat oven to 450 degrees, slice tomatoes, toss in a little olive oil and salt and pepper and roast for 1 hour until caramelized.  Remove from oven, let cool and remove skins.
    • During this time add the jalapeno and roast for 10 minutes.  Remove from oven and remove skin and seeds.
    • Place roasted tomatoes and jalapeno in a food processor and blend until smooth.  Place in a bowl.
    • Blanch remaining tomatoes for 1 minute, remove skins and grate on a box grater and add to roasted tomatoes.
    • Add remaining ingredients, season with salt and pepper to taste and chill until ready to use. 
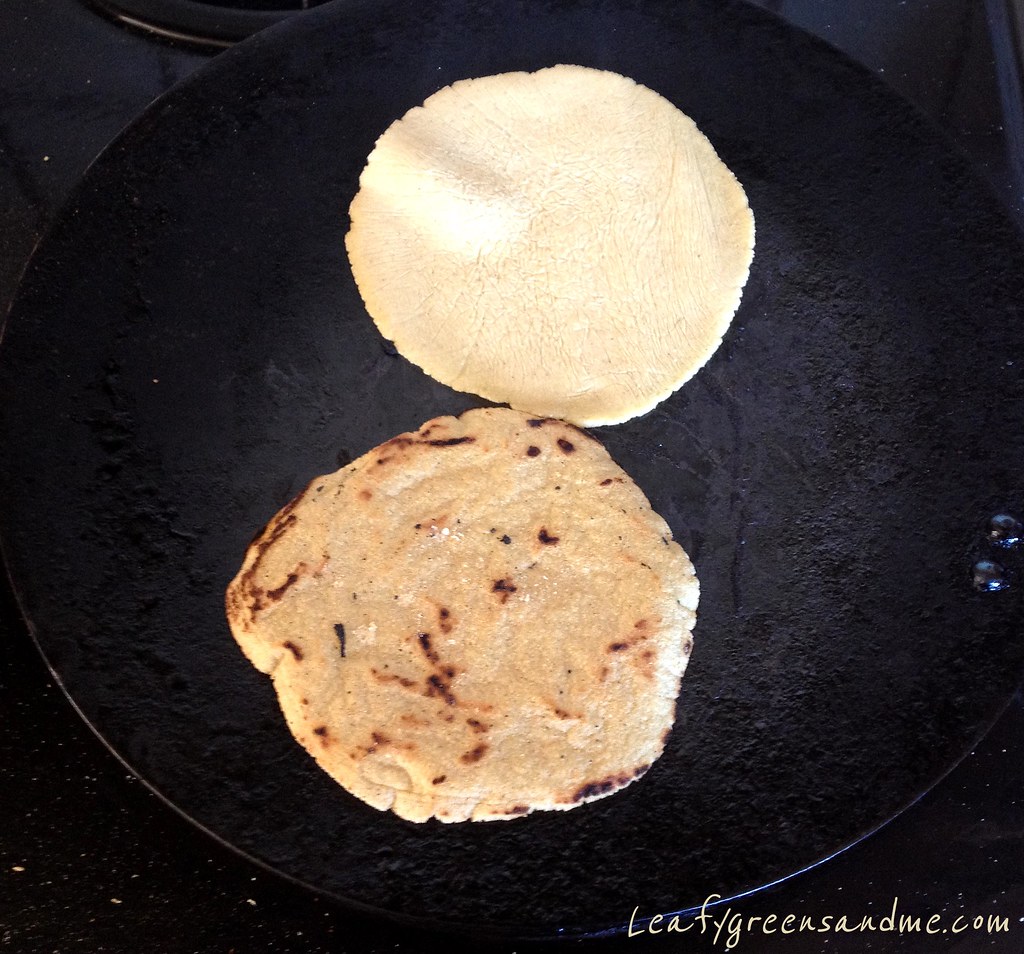
    I don't know why I stopped making my own corn tortillas from scratch.  The texture and flavor is so much better than what you purchase at the store.  Yes, it takes about one hour from start to finish, depending on how many you make but it is so worth it.  This recipe made 24 small 5-6" tortillas.


    I used 2 cups of masa and 1-1/3 cups of water.  You don't need a tortilla press--just a rolling pin and two sheets of plastic wrap coated with masa flour.  I also prefer smaller tortillas and so I used a small ice cream scoop to portion the masa.  The most important tip is to keep the masa covered with plastic while rolling out the tortillas.  Also, as you remove the cooked tortillas from the grill pan, wrap them in a kitchen towel to keep warm until all tortillas are done.


    Also, no oil is needed in the pan.  Just make sure that you use a cast iron skillet or griddle because you need to cook them on medium-high heat and the more charred the better!  Cook them for about 1 minute per side and then wrap in a kitchen towel to keep warm.  Enjoy!


    Thursday, September 1, 2011

    Tuscan White Bean & Roasted Tomato Sandwich

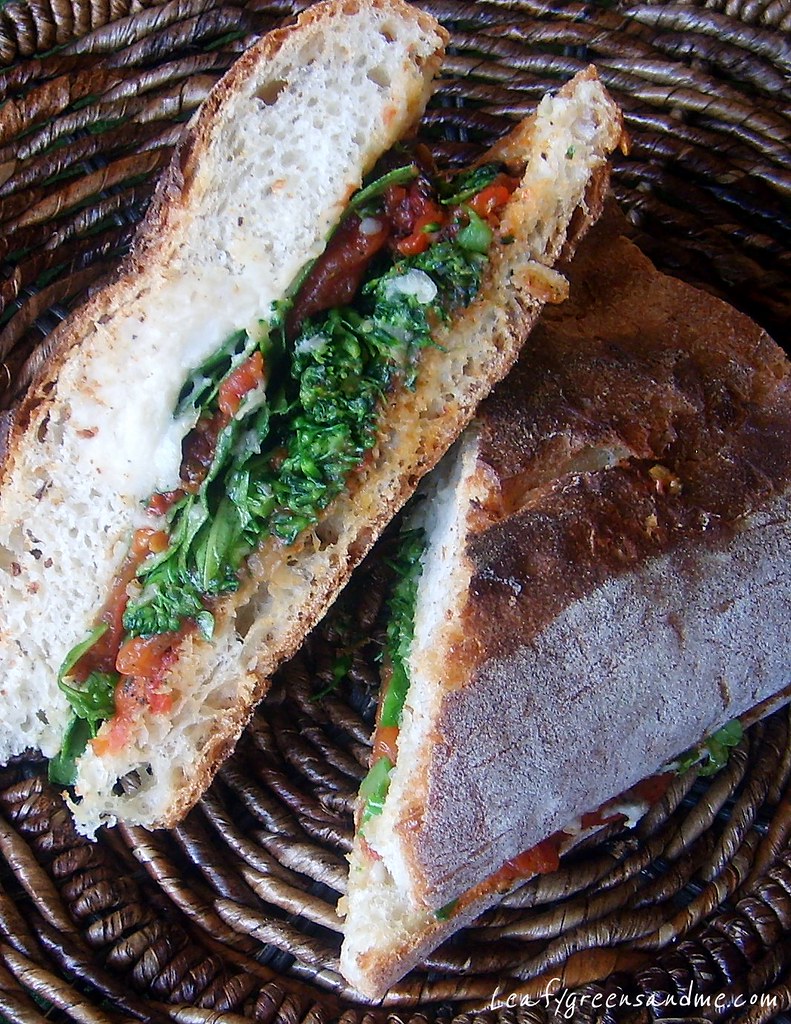
    Do you know how some people like to sit around and people watch...well, I'm a grocery cart watcher.  It always amazes me what people purchase at the grocery store.  For the most part American's eat incredibly unhealthy and you can see it by standing in the checkout line of any grocery store.  I think I actually shocked the checker when I placed my ingredients on the conveyor belt because he commented that I must eat really healthy and he wished that he did more often.  And here I am walking around the store stressing about my Ciabatta bread purchase because it wasn't sprouted whole grain!  Anyway, the rest of the ingredients (cannellini beans, tomatoes, broccolini and arugula) make up for the fact that I used white bread.  Because you can't make an authentic Italian sandwich without Ciabatta!


    Oven Roasted Tomatoes:

    8 large ripe Roma tomatoes, sliced in half lengthwise
    1 tbsp minced garlic
    1 tsp minced fresh rosemary leaves
    1 tsp minced fresh thyme leaves
    2 tbsp extra virgin olive oil
    Course sea salt and black pepper to taste

    Method:
    • Preheat oven to 400 degrees.
    • In a large bowl, toss tomatoes with garlic, herbs, salt and pepper.
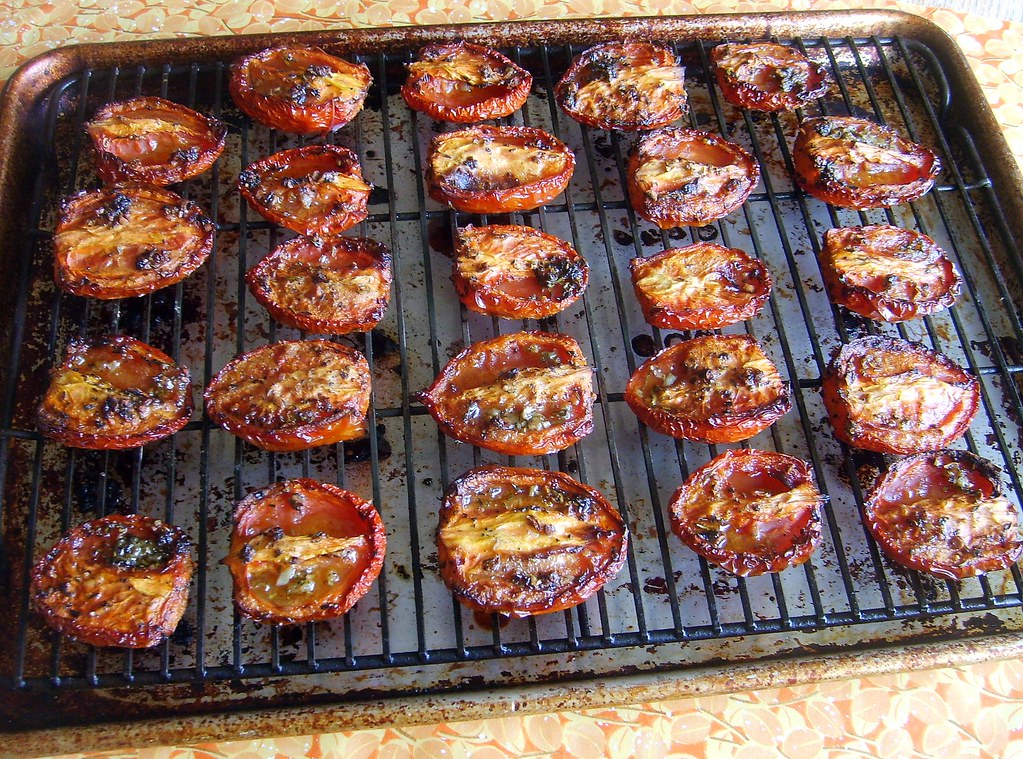
    • Place tomatoes on a baking rack positioned over a sheet tray and roast for about 1-1/2 hours until lightly charred and most juices are absorbed.
    • Remove from the oven and let cool for about 15 minutes before removing skin.
    • Slice into 1/4" strips, set aside.
    Cannellini Bean Spread:

    1 cup dried cannellini beans, soaked overnight drained and cooked until tender (or you can substitute 1 can, rinsed and drained
    2 tbsp minced garlic
    1 tsp minced fresh rosemary leaves
    1 tsp minced fresh thyme leaves
    1 tbsp minced parsley
    1/2 tsp lemon zest
    Juice of 1/2 lemon or more to taste
    3 tbsp extra virgin olive oil
    Kosher salt and freshly ground pepper to taste

    Method:
    • In a small saute pan over low heat, add olive oil, garlic, herbs and saute for about 3-4 minutes until garlic is soft.  Be careful not to let the garlic brown, stirring constantly.  
    • Place cooked cannellini beans in a bowl, and mash with a fork or potato masher.  I used a pastry cutter.  You want the beans to have some texture.
    • Stir in olive oil mixture, lemon jest, lemon juice and salt and pepper to taste.
    • Chill for about an hour for flavors to combine.
    Sauteed Broccolini:

    1 bunch broccolini, remove about 1/2" of the bottom stem and slice large stalks in half lengthwise
    2 tsp minced garlic
    1 tsp crushed red pepper flakes
    2-3 tbsp extra virgin olive oil
    Kosher salt and freshly ground pepper to taste

    Method:
    • Fill a medium sauce pan with filtered water, add 1 tbsp kosher salt and bring to a rapid boil.
    • Add broccolini and cook for about 1 minute, remove and place in an ice bath to set color.  Drain and dry on a paper towel.
    • Heat a saute pan on medium heat, add crushed red pepper flakes, broccolini stalks, garlic, salt and pepper and saute for about 3-4 minutes until crisp-tender.
    • Remove from pan and place on a cutting board and roughly chop, set aside.
    Other Ingredients/Assembly:

    1 loaf ciabatta bread
    2 cups organic baby arugula or wild rocket
    1/2 cup balsamic vinaigrette (1/2 tsp minced garlic, 1/4 tsp minced shallot, 1 tsp Dijon mustard, 1 tbsp agave syrup, 1/4 cup balsamic vinegar, 1/2 cup extra virgin olive oil and kosher salt and black pepper to taste.
    Fresh lemon juice
    Crushed red pepper flakes (optional)

    Method:
    • Cut ciabatta in half and toast for a couple of minutes in the oven or in a toaster oven.
    • Drizzle both sides with a little vinaigrette and place the cannellini bean spread on both sides.
    • Add the sliced roasted tomatoes to one side of the bread.  Toss the broccolini and arugula with a little balsamic vinaigrette and add to the other side.
    • Finish with a squeeze of fresh lemon juice and more crushed red pepper flakes if desired.


    Tuesday, August 23, 2011

    Pumpkin Seed Falafels with Cashew-Tahini Hummus

    So my three week of mostly eating raw and gluten free is coming to an end.  I guess that my husband and I ate 90% raw and 100% gluten free for the entire three weeks.  And we were both really quite surprised about how good everything tasted.  My husband kept commenting that he felt so healthy eating this way and that everything was so fresh and flavorful.  Also, unless you stop eating gluten for a period of time, you have no idea how many bread/wheat products you consume on a regular basis.  So needless to say, I am definitely going to incorporate more raw and gluten free dishes into our vegan diet. 

    However, there are some challenges with eating raw and also with gluten-free baking.  When preparing raw food you really have to plan ahead, unless of course you're just going to drink smoothies or eat salads.  But if you want to prepare gourmet raw food you need about 2-3 days in order to soak, sprout or dehydrate your ingredients.  It's really a whole new mindset to cooking.  Also, it's quite expensive.  If we were to eat raw full-time I would look into purchasing ingredients such as nuts and seeds through wholesale.  Plus "everything" you purchase "has" to be "organic", so that's an added expense.  Gluten-free cooking isn't difficult at all as long as you read labels carefully and make sure no gluten is lurking in the ingredients.  But baking is another story, but once you start experimenting with different flour combinations you become more confident in the outcome.

    Several foods that I missed during the three weeks were:  whole grains, cooked brown rice, any type of cooked beans, tofu, and tempeh.  New techniques/ingredients that I starting using:  making nut milks, sprouting beans, dehydrating ingredients, eating hemp seeds, drinking hemp milk, nama shoyu, goji berries, Celtic sea salt, gluten-free flours and xantham gum.  I have also decided to purchase a Vita-Mix blender.  I have wanted one for the past two years and kept putting it off because I didn't want to spend the money.  Not any longer...I have so many uses for it now that it will pay itself off in no time.  One thing that eating raw has taught me is that I was eating too many prepared and processed foods/ingredients.  From now on, every condiment I use whether it be ketchup, mustard, vegan mayonnaise, sour cream, almond butter, peanut butter, etc., will be made from scratch instead of purchasing it at the store.  I will also cut back on using processed oils as well. 


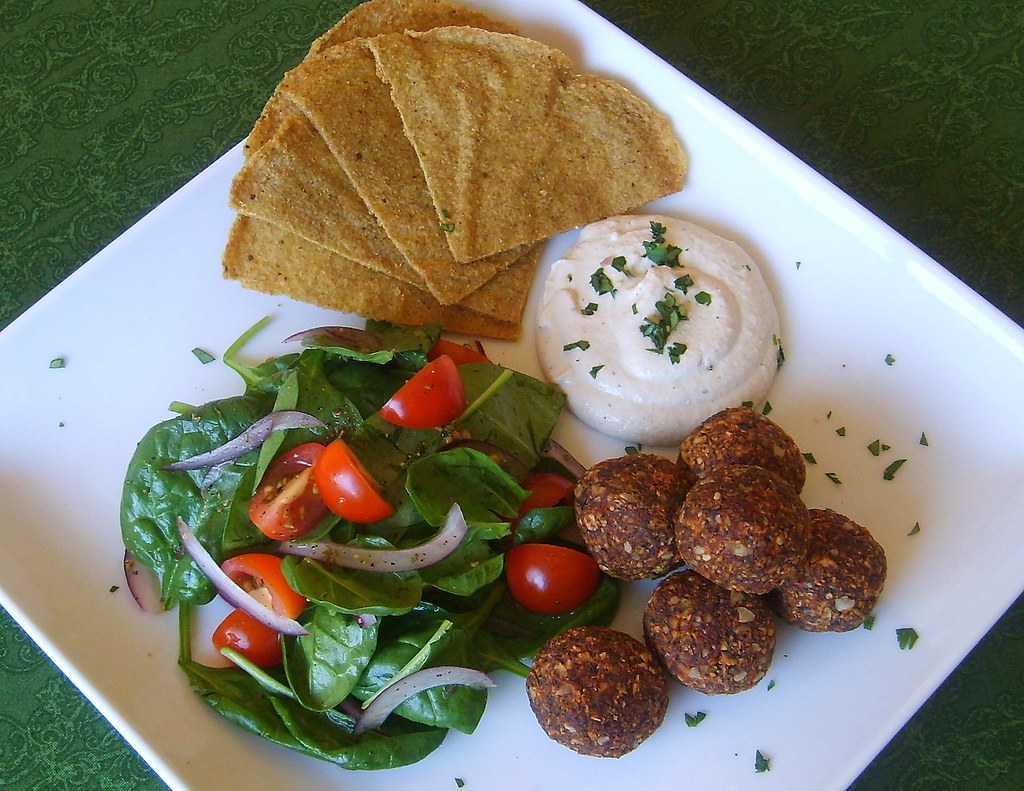
    So for tonight's dinner I wanted to try a recipe for falafels by Russell James, The Raw Chef (you can find the recipe on his website).  His recipe calls for a wrap made out of zucchini and flax meal, but since I don't have a dehydrator, it was very difficult to obtain the right texture for the wrap and it was breaking apart and so I just cut it into smaller pieces.  Also, his recipe called for a macadamia nut hummus, but I made a cashew hummus instead because I didn't want to purchase macadamia nuts at $19/pound.  Anyway, the falafel and hummus had great flavor and texture, and it is very similar to my "cooked" Middle Eastern Falafel Plate that I made previously.

    Anyway, I learned so much over the past three weeks and I feel so much healthier by changing my diet.  Also, I hope that you'll try some of the raw or gluten-free recipes that I've posted even if you're not into eating this way.  And if you are interested in raw and gluten-free baking, keep checking back because there will be many more to come!  And once I get my Vita-Mix, I can't wait to start making raw desserts--they look absolutely yummy!   

    Sunday, August 21, 2011

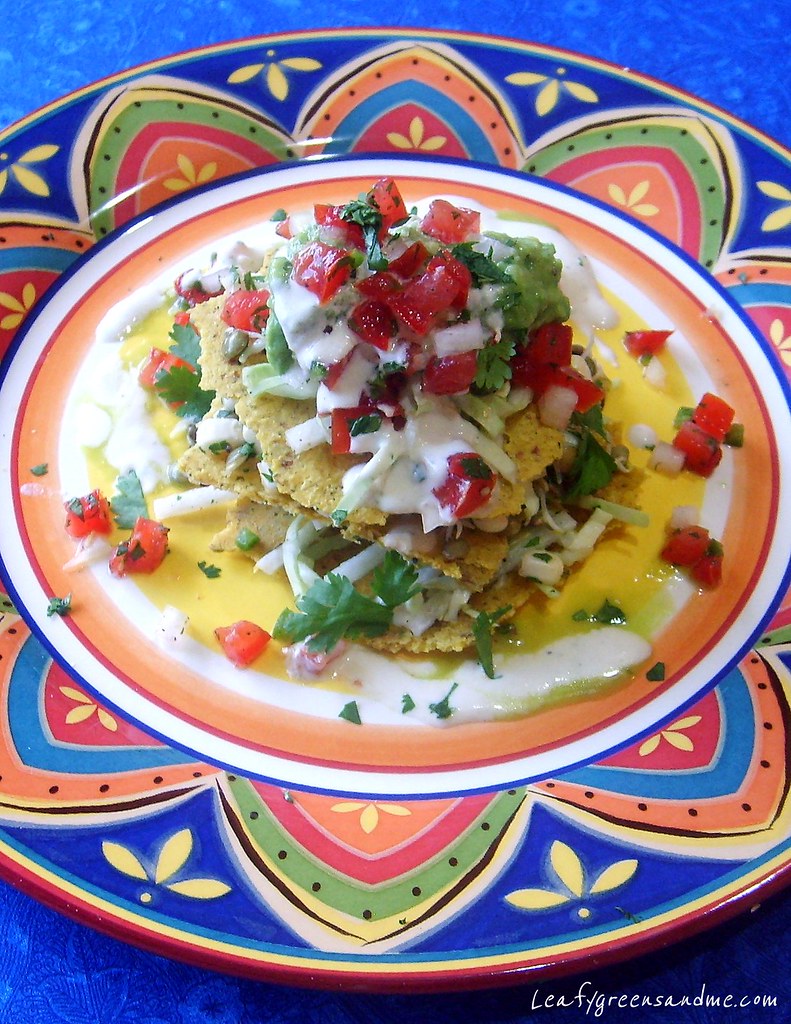
    Sprouted Lentil Tostada with Lime Cream Fraiche

    The other day when I sprouted lentils I had enough to make another dish and so I made a raw tostada with homemade tortilla chips.  Just for a taste comparison, I made two versions...one with raw tortilla chips and the other with corn tortillas, cut to size and baked in the oven until crisp.  I then put my husband through a taste test.  Surprisingly, he liked them both equally in terms of flavor and texture, and so did I.  They were very different, but were equally delicious.  Again, I do not have a dehydrator and so I baked my raw tortillas in the oven at the lowest temperature, about 150 degrees until crispy.  The first sheet tray of tortillas I cooked too long and they just crumbled apart, but the second tray turned out perfect and I was able to break them into different sizes so that I could stack the tostada with yummy, fresh ingredients!

    Corn Tortilla Chips:

    2 cups yellow frozen corn, thawed and drained
    1 cup raw almonds, soaked
    3/4 cup hemp seeds
    3/4 cup golden ground flax seed
    1/2 cup raw pinenuts
    1 tsp cumin powder
    1/2 tsp turmeric powder
    1/4 tsp dried oregano
    1/4 tsp paprika
    1 tsp sea salt
    1/4 tsp black pepper
    2-2 1/4 cups filtered water--you want the batter to be thick, but still easy to spread.
    Note:  I'm not certain how long the tortilla chips will take in a dehydrator, but probably 12-15 hours, maybe longer.

    Method:
    • Pre-heat oven to lowest temperature.
    • Soak almonds in filtered water for about four hours, drain.
    • Place almonds in a food processor and process until fine.
    • Add corn kernels and process again, scraping down the sides.
    • Add all other ingredients and blend until smooth.
    • Line two sheet trays with silpats and divide batter between trays and smooth with an off-set spatula.  Cover the entire surface completely.  You want the batter to be about an 1/8" thick.
    • Bake in the oven for about 3-3 1/2 hours, turning tray frequently and making sure that it does not cook too quickly.
    • Once firm with no raw batter visible and pliable, remove tray from oven and carefully flip onto another tray and carefully remove silpat.
    • Return to the oven and bake again on the other side until crisp, but still pliable, checking frequently and being careful not to burn.
    • Remove from oven and let cool before breaking into desired pieces.
    Other Ingredients:

    1 cup sprouted French green lentils
    1 cup fresh corn kernels
    1 cup shredded jacima
    1 cup shredded green cabbage
    2 tbsp minced cilantro leaves
    Juice of 1-2 limes
    Sea salt and fresh black pepper to taste
    Pico de Gallo Salsa (Roma tomatoes, jalapeno, onion, cilantro, lime juice, s&p)
    Guacamole (Avocado, lime juice, cilantro, garlic powder, onion powder, s&p)
    Cashew Creme Fraiche (Cashew cream, lime juice, minced cilantro, s&p)
    Cilantro leaves for garnish

    Method:
    • In a medium bowl mix together sprouted lentils, corn, jacima, green cabbage, minced cilantro, lime juice and salt and pepper to taste.  Set aside.
    • To plate, place a couple of tortilla chips on a plate and top with sprouted lentil mixture, top with a couple more chips and add more lentils.  Garnish with guacamole, cashew cream, pico de gallo and cilantro leaves.


    Wednesday, August 17, 2011

    Sun-Dried Tomato & Cashew-Basil Ricotta Pizza

    I recently checked out a book from the library called Everyday Raw by Matthew Kenney and decided to make his recipe for Tomato, Basil and Ricotta Pizza.  I really liked the flavor and freshness of the pizza, but I felt the crust became a little soft once the toppings were added.  This could be my fault because I rolled out the dough to a 1/4" thickness when the recipe recommended 1/2", or maybe it's because I don't have a dehydrator and I baked my crust at a really low oven temperature instead of dehydrating for 24-36 hours.  Anyway, applying "raw" principles to food is still really new for me, but I'm starting to get the hang of it.

    Also, instead of making a Macadamia/Ricotta with nutritional yeast, I used cashew nuts with a mild miso paste and omitted the nutritional yeast entirely.  I also added fresh basil as an added flavor component.  For the sun-dried tomato spread, I added minced capers and dried Italian seasonings.


    I might try making the crust again or experiment with a baked gluten-free pizza crust and then add the raw toppings afterwards.  Also the sun-dried tomato spread and the cashew ricotta would be great served on toasted bruschetta or crostini.  Again, the flavors were great.  It's really amazing how fresh ingredients taste when they are eaten raw and minimally processed.  You can definitely taste the difference!

    Cashew-Basil Ricotta
    :


    1 cup raw cashews, soaked for 4 hours
    1 tsp lemon zest
    1/4 cup filtered water
    1/2 tsp minced shallot
    1/2 tsp minced garlic clove
    1 tbsp organic mild miso paste
    3/4 tsp sea salt
    1/4 tsp black pepper
    1-2 tbsp minced fresh basil leaves

    Method:
    • Drain the cashews and place in a food processor along with all the other ingredients, except for the minced basil.
    • Process until smooth and then place in a bowl and stir in minced basil.
    Sun-Dried Tomato Spread:

    1 1/3 cups Roma tomatoes, seeded and chopped
    1 1/3 cups sun-dried tomatoes, soaked in filtered water for 20 minutes
    1/3 cup soaking liquid from sun-dried tomatoes
    2 tbsp minced capers (optional)
    1 tbsp dried Italian seasoning
    1 tsp raw agave syrup
    1/2 tsp sea salt
    1/4 tsp black pepper

    Method
    :

    • Blend all ingredients together in a food processor until smooth.
    Other Ingredients:

    2 cups organic wild arugula
    1 pint organic cherry tomatoes (slow roasted in the oven for about an hour while baking crust)
    1/4 cup minced fresh basil leaves
    Juice of 1 lemon
    First cold pressed extra virgin olive oil
    Sea salt and black pepper


    Friday, July 8, 2011

    Dolmades (Stuffed Grape Leaves)

    There are a lot of different recipes for Dolmades.  Some recipes add diced tomatoes, currants, pine nuts, cinnamon and allspice to their rice, while others just add fresh herbs and lemon juice.  I've been making this recipe for a long time now. I use it to stuff grape leaves, tomatoes, eggplant and bell peppers.  Sometimes in place of the sunflower seeds I'll add pistachios, or I'll cut back on the herbs and add currents and cinnamon.  Regardless of what I add, it still tastes great wrapped in the briny little package.  Serve the Dolmades with Tzatziki Sauce (below) or my Tahini-Mint Sauce, and of course warm pita bread.  I added a little Zatar (oregano, thyme, sesame seeds and sumac) seasoning for additional flavor.
     
    Dolma Filling:

    1 1/2 cups brown long grain rice
    3 cups filtered water
    1 medium onion, diced small
    2 stalks celery, diced small
    4 cloves garlic, minced
    1/3 cup fresh chopped mint leaves
    1/4 cup fresh chopped dill sprigs
    1/4 cup fresh chopped basil leaves
    1/4 cup fresh chopped parsley leaves
    1 1/2 tsp dried Greek oregano leaves
    1/4 cup roasted sunflower seeds
    Juice of 2 lemons
    1 tsp kosher salt
    1/4 cup black pepper
    1/4 cup extra virgin olive oil
    2-3 cups vegetable stock
    1 2 pound jar of grape leaves
    Note:  You'll have a lot of leaves left over with this recipe.  This recipe makes about 20 Dolmades.  I've purchased the smaller 1 pound jars and ended up not having enough leaves because they were torn.

    Method:
    • Bring water to a boil, add rice and simmer for about 10 minutes until slightly tender.  Drain really well and set aside.
    • In a large saute pan, cook onions, celery and garlic in 2 tbsp of olive oil until soft.  Add rice, along with dried oregano, fresh herbs, sunflower seeds, salt and pepper to taste and the juice of 1 lemon.  Stir to combine and set aside.
    • Add plenty of water to a large stock pot, and bring it to a rapid boil.  Remove grape leaves from the jar and separate the leaves and drop them in the boiling water and blanch for about one minute.  Remove leaves and drain well.  Sort through the leaves and pick ones that are similar in size and that are not ripped or torn.  Also, remove the stem if there is one.  The remainder of the leaves can be used to line the bottom of the pot to keep the Dolmades from burning while cooking.
    • I then create an assembly line and work with about 10 Dolmades at a time.  I use a small ice cream scooper so that each dolma is about the same size.  
    • Lay the grape leaves with the smooth side down, place a scoop of rice near the base of the leaf and roll up tightly like a burrito.  
    • Once all the leaves are stuffed and rolled, line the bottom of the stock pot with extra leaves and place Dolmades seam side down tightly next to each other, working from the outside of the pan to the center.
    • Add enough vegetable stock to cover the tops of the grape leaves by about 1", about 2-2 1/2 cups.  Add 2 tbsp extra virgin olive oil and the juice on 1 lemon.
    • Place several smaller plates directly on top of the Dolmades to weigh them down so that they don't float and open up while cooking.
    • Cover with a lid, bring to a boil and reduce heat to a simmer and cook for about 1 hour until Dolmades are tender.  They may take longer or shorter to cook depending on how tough the leaves are.  Check during cooking process to make sure that the stock has not evaporated.  Add more if necessary.
    • When finished, remove Dolmades and strain liquid into a small sauce pan.  Add a pinch of dried oregano and reduce sauce by half.  Pour sauce over Dolmades and serve.
    Tzatziki Recipe:

    8 oz Follow Your Heart Sour Cream
    3 cloves garlic, minced
    2 cups English cucumbers, diced small
    2 tbsp minced dill leaves
    1/4 cup minced mint leaves
    2 tbsp red wine vinegar
    1 tbsp lemon juice
    1 tbsp extra virgin olive oil
    1 tsp kosher salt
    1/4 tsp black pepper

    Method:
    • In a small bowl, mix all ingredients together until combined.  Chill until ready to use.


    Sunday, July 3, 2011

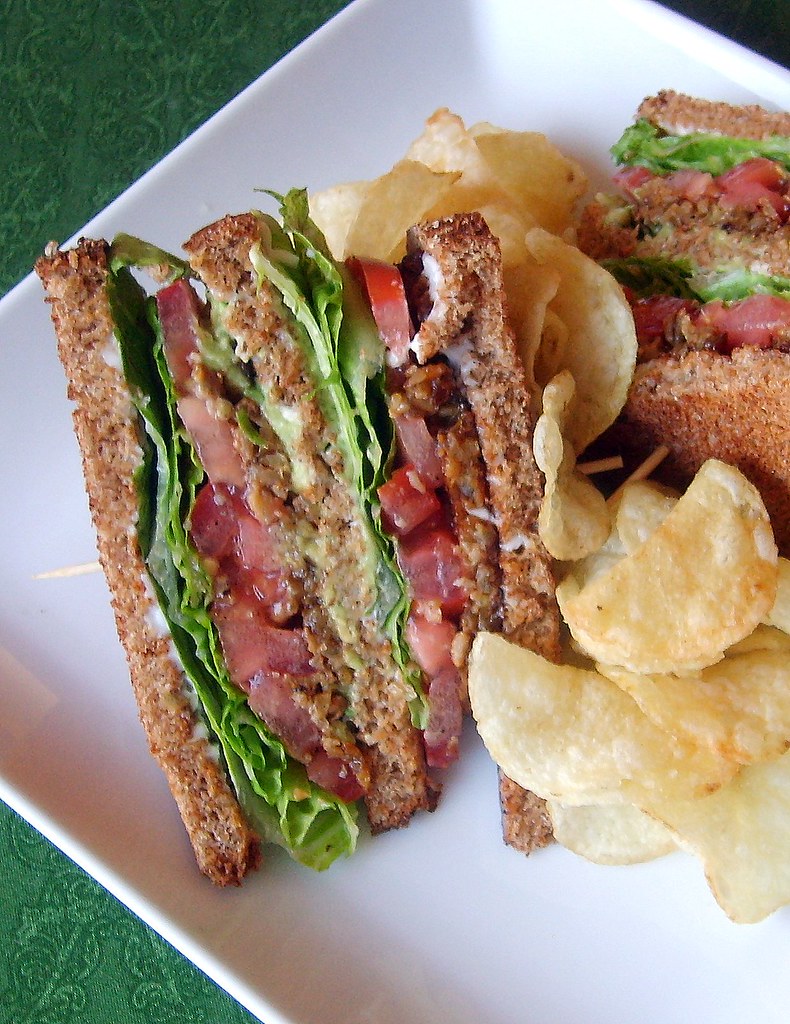
    Tempeh Club Sandwich with Avocado Aioli

    Wow it was HOT today, about 95 degrees!  We were thinking about heading over to Santa Cruz (about 30 minutes from our house), but everyone else in Silicon Valley had the same idea and so we just hung out by the pool.  We can go to the beach any weekend and the last thing I wanted to be doing was sitting in bumper-to-bumper traffic trying to get to the beach.  All and all it was a good day spent relaxing...catching up on reading and chowing down on a delicious sandwich, accompanied by a nice cold beer.  A good day indeed!


    Maple Marinade/Glaze:

    1 8oz package of organic three grain tempeh
    1/2 cup pure maple syrup
    1/4 cup organic soy sauce
    1/2 tsp smoked paprika
    1/2 tsp onion powder
    1/2 tsp paprika
    1/2 tsp mustard powder
    2 tbsp filtered water
    Note:  I use this marinade all the time for tempeh when I want to impart a sweet-smokey flavor.

    Method:
    • Slice tempeh in half and steam for 12-15 minutes.  Let cool and cut into thin strips.  
    • Place strips in a casserole dish or a sheet pan with sides and pour over marinade and marinate for 30 minutes.
    • Drain marinade into a small sauce pan and reduce to a syrup.  Set aside.
    • Blot tempeh strips with a paper towel to remove excess marinade. Add a small amount of canola oil to a frying pan and fry tempeh strips for about 3-4 minutes on each side until crispy brown.
    • Remove from pan and pour over syrup to coat.  Set aside.
    Avocado Aioli:

    2 ripe avocados, peeled and smashed with a fork
    Juice of 1 lemon or lime
    2 tbsp Vegenaise or sour cream
    Salt and black pepper to taste

    Sandwich Ingredients:
    Makes two sandwiches

    100% whole wheat bread, toasted (3 slices per sandwich)
    2 large ripe tomatoes, sliced
    Romaine lettuce leaves
    Maple glazed tempeh strips
    Avocado Aioli
    Vegenaise
    Salt and black pepper to taste
    Note:  This sandwich is huge--one sandwich can feed two people, or one really hungry person.

    Wednesday, June 15, 2011

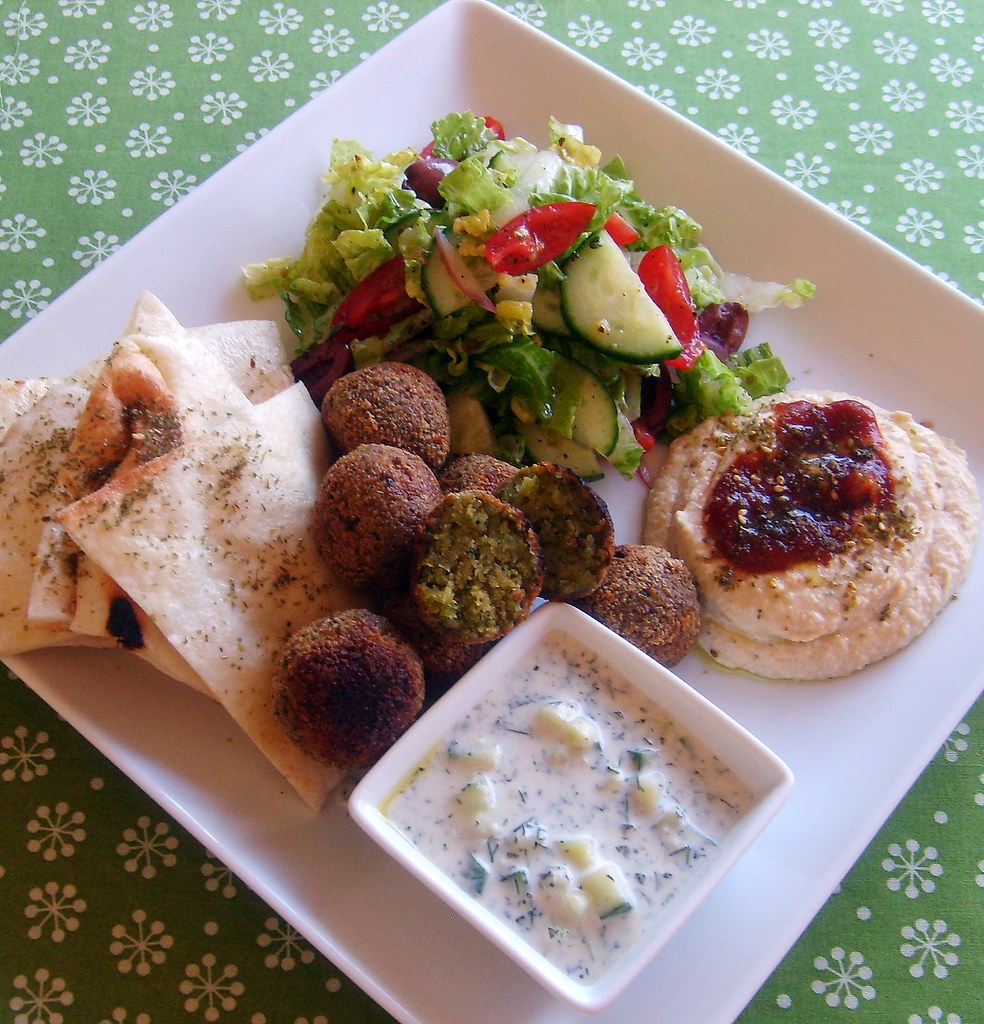
    Middle Eastern Falafel Plate

    I can't begin to tell you how many falafel recipes I've tried in my lifetime.  I have used boxed mixes from Middle Eastern stores, bulk mixes from health food stores, and made numerous recipes found on the internet and in cookbooks.  And no matter what I do I still can't get the consistency and flavor of my favorite falafel restaurant, The Falafel's Drive-In in San Jose.  There's just something about their falafels--they are crunchy on the outside and fluffy and bright green on the inside. 

    In my quest for the perfect falafel recipe, I've used fresh chickpeas in place of dried, added fresh fava beans to dried chickpeas, used cooked chickpeas and tried practically every herb/spice combination.  I have also experimented using peanut oil, canola oil and olive oil for deep frying or pan searing and formed the falafels into disks or balls.  Perhaps I should just give up, or better yet, apply for a job at Falafel's Drive-In to learn their secrets.  In the meantime, I'll just make the drive to San Jose whenever I need my falafel fix!  This recipe is good, but not perfect...so back to the kitchen for me!   


    Falafel Ingredients:

    2 cups chickpeas, soaked for 24 hours, drained and dried with paper towels
    4 garlic cloves, minced
    2 scallions, finely chopped
    1/4 cup fresh cilantro, chopped
    1/4 cup fresh mint, chopped
    1/4 cup fresh parsley, chopped
    1/4 - 1/2 tsp cayenne pepper
    3 tsp ground cumin
    4 tsp ground coriander
    2 tsp baking powder
    1-1/2 tsp kosher salt (or to taste)
    1/4 tsp black pepper
    1 tbsp olive oil
    Juice of 1/2 lemon
    1 liter Canola oil for deep frying

    Method:
    • Place drained and dried chickpeas in a food processor and pulse until coarsely ground.  Add all other ingredients (except canola oil) and pulse until combined.  Do not grind to a paste, you still want some texture.
    • Using a tsp form mixture into small balls or disks.  I used a small ice cream scooper for consistency.
    • Let falafels balls chill in the refrigerator for about 30 minutes for flavors to combine.
    • Heat oil in a deep dutch oven to 350 degrees.
    • Add falafels in batches and cook until golden brown about 3-4 minutes.
    • Drain on paper towels and keep warm. 
    Tzatziki:

    8 oz Vegan sour cream (I used Follow Your Heart Brand)
    3 cloves garlic, minced
    2 cups English cucumber, finely diced
    2 tbsp fresh dill, finely minced
    1/4 cup fresh mint, finely minced
    2 tbsp red wine vinegar
    1 tbsp fresh lemon juice
    1 tsp kosher salt
    1/4 tsp black pepper
    Note:  Normally I serve falafels with Tahini Mint Sauce, but I had left over Tzatziki from another dinner and so I used this instead.

    Method:
    • Mix together all ingredients in a bowl and refrigerate for at least 30 minutes for flavors to combine.
    I served my falafels with homemade hummus garnished with hot sauce and zatar and a cucumber-tomato salad with red wine-oregano vinaigrette.


    Saturday, June 4, 2011

    Roasted Tomato-Jam Caprese Panini

    What do you do when you're stuck in the house all day cleaning because it's raining outside?  Well...you slow roast Roma tomatoes in the oven to make a tomato jam for a caprese sandwich and roasted tomato-basil soup.  My house smelled of garlic, thyme, rosemary and basil all day today.  It sure makes cleaning a whole lot easier.  Unfortunately, I still need to do the dishes, but thankfully soup and sandwiches are an easy clean-up!


    Slow Roasted Tomatoes: 

    12 large Roma tomatoes, stems removed, sliced in half lengthwise, seeded
    1 tbsp fresh thyme, minced
    1 tbsp fresh rosemary, minced
    4 garlic cloves, finely minced
    Extra virgin olive oil
    Kosher salt and freshly ground black pepper

    Method:
    • Preheat oven to 250 degrees.
    • Toss tomatoes with herbs, olive oil, salt and pepper and place on a rack on top of a sheet pan to catch drippings.
    • Slow roast tomatoes for four hours, turning tray every hour.
    • Let tomatoes cool and remove skin.

    Roasted Tomato-Basil Soup:

    1 medium onion, diced
    1/2 cup celery, diced
    1/2 cup carrots, diced
    4 garlic cloves, minced
    1 tbsp tomato paste
    1/4 cup red wine, white wine or vegetable stock
    4 sprigs fresh thyme
    1 bay leaf
    6 slow roasted Roma tomatoes, chopped with juices
    1 14.5 oz can diced tomatoes
    3-4 cups filtered water
    1 tbsp extra virgin olive oil
    Kosher salt and pepper to taste
    1 tbsp fresh basil, minced

    Method:
    • In a sauce pan, heat olive oil and cook onions, celery and carrots until soft, about five minutes.  Add garlic and cook two minutes longer, stirring to prevent burning.
    • Add tomato paste and red wine and cook until wine has evaporated, about two minutes.
    • Add roasted tomatoes, diced tomatoes, water, thyme and bay leaf.  Bring to a boil and reduce to a simmer and cook for about 40 minutes.  Adding more water if necessary.
    • Add tomato mixture to a blender in batches and blend until smooth, adding salt and pepper to taste.
    • Strain soup through a mesh strainer to remove any skins or seeds and return soup to the pan and place heat on low to keep warm.  Check seasonings and just before serving stir in fresh basil.
    Roasted Tomato Jam:

    6 slow roasted Roma tomatoes, finely chopped with juices
    2 tbsp extra virgin olive oil
    Kosher salt and freshly ground black pepper

    Method:
    • Place all ingredients in a bowl and stir to combine.  Let sit at room temperature until ready to use.
    Caprese Panini:

    1 sweet Italian batard, sliced on a bias, 1/2" slices
    1/2 bunch fresh basil leaves
    1 cup roasted tomato jam
    1 cup Daiya Mozzarella Style Cheese
    1/2 cup Daiya Cheddar Style Cheese
    Extra virgin olive oil
    Kosher salt and fresh ground black pepper

    Method:
    • Brush the outside of each bread slice with olive oil, turn over and sprinkle with mozzarella and cheddar cheese.  
    • Next spoon on tomato jam, add basil leaves, and more mozzarella cheese.
    • Close sandwich and grill on panini press for 2-3 minutes until golden brown and cheese has melted.  
    • Slice on a bias and serve with a bowl of roasted tomato-basil soup. 


    ShareThis