Thursday, August 11, 2011

Dried Fruit & Nut Energy Bars

A friend and I go on a two hour hike every week and I'm always rushing out of the house at 8:30 AM to meet her.  I'm really not interested in whipping up a green drink before I leave, but I feel that I should eat something small before or during our hike.  I started purchasing some vegan energy bars but some are really high in fat and sugar and so I thought that I would make my own.  Now, I haven't calculated the sugar, carb or fat grams for these mini bars (wouldn't know where to begin), but they can't be all that bad.  Most importantly they are homemade, delicious and provide me with enough of carbs and protein to fuel our morning hike.  Kids will love them too--it's a great replacement for cookies!  So Val, if you read this before we meet tomorrow morning--don't eat anything for breakfast because I'll be bringing along some of these healthy high-energy bars!


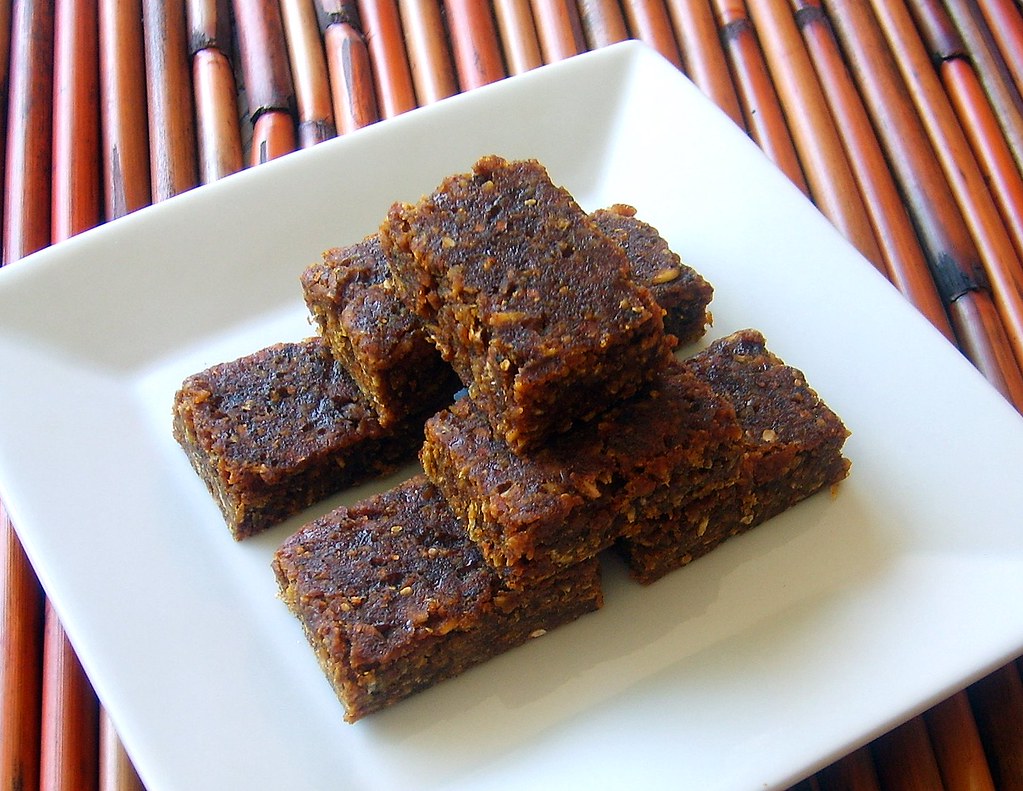
If you have a dehydrator then you can easily serve these raw.  I don't and so I slowly baked them at the lowest "warm" oven temperature which ranges about 135-145 degrees depending on the location in my oven.  It took about 13-15 hours at this temp to get them to be the right consistency.  Of course if you don't care about eating raw energy bars, then I would turn up the oven to 250 degrees and cook them in half the time.   Since I don't have a dehydrator, I'm not certain how long they would take, but it would be fun experimenting though if I had one!

Ingredients:

1/2 cup raw almonds, soaked
1/2 cup raw sunflower seeds, soaked
1 cup Medjool dates, pitted and soaked
1 cup Turkish apricots, soaked
1/3 cup goji berries, soaked
1/4 cup raisins, soaked
1 cup gluten-free, rolled oats, soaked
1/2 cup unsweetened desiccated coconut flakes
1/4 cup ground flaxseed
1/4 cup agave syrup
1 tbsp ground cinnamon
1/2 tsp sea salt

Method:
  • Pre-heat oven.
  • In a medium size bowl, soak almonds, sunflower seeds, dates, apricots, goji berries and raisins for about 1 hour.  Soak the rolled oats in separate bowl for the same time period.
  • Drain nuts and fruit really well and grind in a food processor until you get a thick paste, scraping down the sides.
  • Add ground flaxseed, agave syrup, cinnamon and sea salt and blend until combined.  Remove paste from food processor and place in a medium size bowl.
  • Drain rolled oats really well and add to paste along with dried coconut and stir well to combine.
  • Line an 8x8" square baking pan with aluminum foil or parchment paper and with a spatula add mixture to the pan smoothing the surface to make sure that it is even and flat.
  • Depending upon what temperature you use will determine when you flip the bar and cook on the other side.  Again, I cooked the bar at my lowest oven temp for 6 hours.  I then removed the pan from the oven, lifted out the bar, flipped it over onto a lined baking sheet and baked it for another 6 hours.  I then cut the bar into individual 1"x2" squares and returned them to the oven for another 1-2 hours.  
  • When finished, let the bars cool to room temperature and then place them in a sealed container, separating layers with sheets of parchment paper.


Tuesday, August 9, 2011

Zucchini Pasta with Basil-Pepita Pesto

Making raw zucchini pasta is like Raw Food 101.  Actually, I feel like I'm back in culinary school learning a whole new way of preparing food and eating.  I've checked out just about every book on raw foods from my local library and I can't stop reading them.  I'm so intrigued by the whole "raw" thing.

To make this dish, it would be helpful if you had a mandolin to slice the zucchini into long thin strips like pasta.  You can slice it by hand, but it will take some time and precision and presentation are really important when eating raw foods.  You can purchase an inexpensive mandolin for about $20 from a restaurant supply store.  Or another nifty gadget would be to purchase a spiral slicer, but they range in price from $30-$100.  I may purchase one eventually, but for now my cheap mandolin worked fine. 


This is a perfect dish for summer and you can't get any fresher then this.  If I wanted to make a raw pasta dish in the winter, I would use root vegetables instead and serve it with a raw sage-cashew cream sauce.  Also, all of the ingredients for this dish should be organic.  If you can't find organic then use a produce wash and scrub really well to remove any pesticides or chemicals.

Basil-Pepita Pesto:

1 large bunch basil (about 3 cups of leaves)
2 garlic cloves, minced
1/4 cup raw pepitas (pumpkin seeds)
Juice of 1-1 1/2 lemons or to taste
2-3 tbsp first cold pressed extra virgin olive oil
Sea salt and black pepper to taste
Filtered water to thin if necessary

Method:
  • Rinse basil and place in a food processor along with garlic, pumpkin seeds and the juice of 1 lemon.
  • Pulse, scraping down the sides of the bowl until you get a smooth consistency and then with the motor running, drizzle in olive oil slowly until emulsified.   Season with salt and pepper and add more lemon juice if necessary.
Zucchini Pasta:
(Serves 2)

2 medium size zucchini
2 medium size yellow zucchini (not yellow crookneck squash)
1/2 pint cherry tomatoes, quartered
1/2 pint orange or yellow pear tomatoes, quartered
Sea salt and black pepper to taste
Fresh lemon juice
1/4 cup pepitas for garnish
Minced basil for garnish
Note:  Look for zucchini that are about 3" in diameter.  If they are too thin you won't get as much yield, plus it's harder to work with when using the mandolin.  If they're too large then they will have too many seeds and will be flavorless.

Method:
  • Using the medium blade on the mandolin, slice zucchini into thin strips, on all sides until you only have the center core of seeds.    
  • Place zucchini in bowl and toss with basil pesto, tomatoes and season with salt and pepper if necessary.   Make sure that you toss the pasta just prior to serving.  The zucchini breaks down really quickly if dressed too soon and you want to keep an al dente texture.
  • Garnish with a squeeze of fresh lemon juice, pumpkin seeds, and chopped basil.  Just delicious!


Sunday, August 7, 2011

Coffee Cake with Almond-Oat Streusel Topping

I had a craving for coffee cake this morning for breakfast.  Now, I know that you're thinking I've fallen off the wagon for my 21 day program, but not really.  The coffee cake is gluten free and made with agave syrup instead of sugar and I only had a really small slice.  The remainder of the cake is for my husband to enjoy.  I just really like baking and wanted to make something gluten free.


For the cake base, I followed the recipe for blueberry crumb cake in the Baby Cakes cookbook.  However, I made several adjustments to the recipe.  Instead of coconut oil (I don't want all the saturated fat), I used canola oil and instead of rice milk, I used almond milk because I used almonds in my topping.  I also added almond extract and coffee extract to the batter instead of just using vanilla and I omitted the blueberries all together.  Finally the recipe in the book uses leftover cupcakes for the crumb topping.  Now, I'm not about to make a batch of 24 gluten free vanilla cupcakes just so that I can create a crumb topping for my coffee cake--seems a bit excessive!  So I made my own streusel topping using gluten free oats, oat flour and almond meal.  I also made my own glaze using cashew cream, agave syrup and coffee extract.  So how did it taste...well it was quite good actually.  The cake had a really nice texture and worked well with the crunchy almond topping.  And my husband ate two pieces so I know that he really liked it.


Cashew Coffee Cream Glaze
:


1/2 cup raw cashews, soaked for at least four hours
1 cup filtered water
1 tbsp agave syrup or more to taste
1/2 tsp coffee extract (optional), or vanilla extract

Method:
  • Soak cashews in filtered water, drain and place cashews in a blender and add 1 cup filtered water and blend on high for 4 minutes until creamy.
  • Place in a bowl and stir in agave syrup and coffee extract and set aside.
Almond-Oat Streusel Topping:

1/2 cup almond meal
1/4 cup Bob's Red Mill gluten free oat flour (optional, you can grind your own oat flour in a spice grinder with rolled oats, see below)
1/2 cup Bob's Red Mill gluten free whole rolled oats
1/4 cup roughly chopped almonds
1 tsp ground cinnamon
1/4 cup agave syrup
1 tbsp Earth Balance Buttery Sticks, melted

Method:
  • Place 1/2 cup sliced raw almonds in a food processor and grind to a fine meal.  Measure out a 1/2 cup almond meal and place in a medium bowl.
  • Place 1/4 cup whole rolled oats in a spice grinder and grind into a fine flour.  Measure out a 1/4 cup oat flour and add to the almond meal.
  • To the bowl of almond meal and oat flour add the remaining ingredients and stir to combine.
  • Refrigerate until ready to use.
Cake Base:

2/3 cup Bob's Red Mill Gluten-Free A/P Flour
1/3 cup brown rice flour
2 tsp ground cinnamon
1 tsp baking powder
1 tsp baking soda
1/4 tsp xanthan gum
1/2 tsp kosher salt
1/4 cup canola oil
1/3 cup agave syrup
1/3 cup almond milk
1 1/4 tsp vanilla extract (if you omit the coffee and almond extracts, then increase the vanilla to 2 tsp)
1/2 tsp coffee extract
1/4 tsp almond extract
1/2 tsp lemon zest
Canola spray

Method:
  • Preheat oven to 325 degrees and place rack in the middle of the oven.
  • Line the bottom of a 9x3" round cake pan with parchment paper and spray the bottom lightly with canola spray.
  • In a medium bowl, sift together a/p flour, rice flour, cinnamon, baking powder, baking soda, xanthan gum and kosher salt and set aside.
  • In another bowl, whisk together, canola oil, agave syrup, almond milk, extracts and lemon zest.
  • Add liquid ingredients to dry ingredients and stir to combine.
  • Pour into prepared cake pan and using your fingers crumble almond-oat streusel topping evenly over top of batter.
  • Bake in the oven for 15 minutes and then turn cake and then bake another 15 minutes until golden brown.
  • Remove cake from the oven and cool on a baking rack for about 20 minutes.
  • Gently run a knife around the edge of the cake and cover with a baking sheet and turn cake upside down.  Remove cake pan and then place a plate on the bottom of cake and then re-invert cake onto plate.
  • Cut cake into slices and drizzle with cashew-coffee cream.


Saturday, August 6, 2011

Maki Sushi with Wakame Salad and Edamame

Making maki and nigiri sushi with brown rice is a bit more difficult than using white sushi rice because brown rice has a lower starch content.  If you're not concerned about getting more nutrients in your rice and you've never made sushi rolls before, then I definitely recommend that you purchase Japanese sushi rice and follow the directions on the package for cooking.

I used two cups of short grain brown rice and added a little additional water and over cooked it until all the water was absorbed to bring out the starch.  After the rice was cooked, I then added 1/3 cup rice vinegar and two tablespoons agave nectar and then let the rice cool to room temperature before using.


You can use whatever vegetables you like for the filling for the maki rolls.  I used finely sliced cucumber, carrots, zucchini, red bell pepper, avocado and baked tofu.  I also used toasted white and black sesame seeds and broccoli sprouts for garnish.  I served my rolls with steamed organic edamame and a wakame (seaweed) salad that I purchased from a local Japanese grocer. 

If you've never made maki rolls before and you would like to learn how to make them, there are several YouTube videos online that will walk you through each step of the process.  For sushi making products or kits, most specialty grocery stores sell bamboo sushi mats, nori sheets, pickled ginger and wasabi--everything you'll need to make delicious and nutritious sushi at home!

Friday, August 5, 2011

Roasted Tomato Tart with Herbs de Provence

Wow, gluten free baking is expensive!  I opted to purchase Bob's Red Mill Gluten Free All Purpose Flour to save money, but I'm not certain if I did.  His blend includes garbanzo bean, tapioca, sorghum, and fava bean flours, along with potato starch.  If I would of purchased all of these flours separately it would of easily cost me about $25, but I ended up spending that anyway because I purchased a $12 bag of xanthan gum.  Oh well, live and learn, but this is one expensive tomato tart!  I actually skimped on the other ingredients for the tart because it was getting to the ridiculous stage.  I just don't know that much about gluten free baking.  Perhaps I could of skipped the xanthan gum all together or purchased guar gum instead, which is a lot cheaper.


So how did the tart crust turn out?  Well, I'm not sure actually, because I've never eaten a gluten free pie or tart crust before.  The texture was more on the sandy side, not flaky which is what I'm used to.  The bottom of the tart held together nicely and did not get soggy from the tomatoes.  However, the sides were a bit fragile and I had to be careful cutting the tart so that it did not crumble under the pressure of the knife.  Also, the crust didn't have a lot of flavor; however, I could definitely taste a hint of garbanzo bean, which was a bit weird.  Perhaps it's the recipe I used, or I didn't use enough butter, or xanthan gum--I'm just not certain.  Anyway, I'm going to make the tart again so if anyone has any suggestions, I'm definitely listening. 

Crust Ingredients:

2 cups Bob's Red Mill Gluten Free A/P Flour
1/2 tsp Bob's Red Mill Xanthan Gum
1/2 tsp kosher salt
4 oz Earth Balance Buttery Stick, or (1 stick)
1 tbsp ground flaxseed (plus 3 tbsp water)
1-2 tbsp ice water

Method:
  • Preheat oven to 375 degrees.
  • Dice butter and place in the freezer for about 15 minutes before using.
  • Place flour, xanthan gum and kosher salt in a food processor and pulse until combined.
  • Add diced chilled butter and pulse until the size of small peas or oatmeal in texture.
  • In a small bowl, whisk together ground flax and 3 tbsp water and add to food processor and pulse again.
  • Add 1 tbsp of ice water and pulse a couple of times again and then test to see if dough will form into a ball.  If too dry or sandy add additional tbsp ice water and pulse.
  • Remove dough and knead into a ball and form into a flat disk.
  • Roll out dough between two pieces of wax paper to about 1/8-1/4" thick and about 2" larger in size then your tart pan.
  • Transfer dough to tart pan and press dough along bottom and sides of pan, removing excess around the edges.  Prick bottom several times with the prongs of a fork.
  • Freeze tart pan for about 15 minutes before baking.
  • Place tart on a sheet pan in the middle of the oven and blind bake (cover with foil and baking beans) for 10-15 minutes.  Remove foil and baking beans and bake for another 10-15 minutes until crust is firm and starting to pull away from the sides of the pan.
  • Let cool for about 10-15 minutes before adding tomatoes.
  
 
Other Ingredients/Assembly:
 
3-4 lbs ripe Roma tomatoes sliced 1/4" thick, drained
2 tsp Dijon mustard
1/4-1/3 cup basil pesto (1 bunch basil leaves, 2 garlic cloves, 1/4 cup raw pinenuts or walnuts, 1 tbsp nutritional yeast, juice of 1 lemon, extra virgin olive oil and salt and pepper to taste)
1/2 cup Daiya Mozzarella Cheese Shreds
1 tbsp Herbs de Provence
Chopped basil for garnish
Extra virgin olive oil for drizzling
Note:  For my tart, I did not use the basil pesto or Daiya cheese.  As I said above, it was getting too expensive.  When I make it again, I will definitely add these components to the tart.  Also, this tart would work better in a square tart pan because the tomatoes will lay better and cook quicker.  
 
Method:
  • Turn up oven temp to 400 degrees.
  • Slice tomatoes and place on paper towels to drain/dry to remove as much moisture as possible.  
  • Brush the bottom of the tart pan lightly with Dijon mustard, followed by basil pesto and Daiya cheese.
  • Place tart in the oven for about 1 minute for cheese to melt slightly.
  • Remove tart from oven and starting from the edge overlap tomato slices until you get to the center of the tart.
  • Sprinkle with Herbs de Provence and bake for about 10 minutes.  After 10 minutes, turn tart and bake for another 10 minutes until tomatoes are starting to release their juices and are starting to shrivel.  
  • Remove tart from oven and let sit for about 10 minutes before removing from tart pan.
  • Let cool completely before slicing and serve with a side salad of baby arugula dressed in a light lemon vinaigrette.
PS, If you're ever in Portland (we have family who live there), go visit Bob's Red Mill, it's just outside the City.  You can take tours and watch how they mill their flours, or wander around their large grocery store and purchase some of their products that are not available at Whole Foods.  Also, their restaurant serves the best vegan pancakes I've ever tasted!


Thursday, August 4, 2011

Chilled Cucumber-Avocado Soup with Fresh Dill

I really lucked out 27 years ago when I met my husband--he's such a great guy.  When I told him in December 2009 that I was going vegan he said, "no problem" and that he was in "solidarity" with me.  And since, he's never complained or made any negative comments about eating a plant-based diet.  So when I told him that we were going mostly raw and gluten free for the next three weeks, he said it "sounded good" and that he's with the program.

Well just about every weekday morning he has oatmeal for breakfast.  So I did some research and read that Bob's Red Mill Steel Oats is gluten free and so I purchased a bag from Whole Foods.  And sticking with the raw portion of the program I decided to soak them overnight and serve him raw oat cereal in the morning with raw almond milk.  Let me just say that that didn't go over very well.  When I told him that he was having "raw oats" for breakfast, he looked at me and said, "are you serious?", and he looked really bummed.  So no "raw oats" for him over the next three weeks!  Also, he has been asking me to make chilled watermelon gazpacho for the past three years and I never make it for him.  We used to serve it at the restaurant and I got so burned out on it that I just haven't made it since.  So instead of making gazpacho, I made him Chilled Cucumber-Avocado Soup with Fresh Dill and Cashew Cream.  Well it was a big hit and he forgot all about the raw oat disaster and the watermelon gazpacho...at least for the time being!
  
Ingredients:
(Serves 2)

1 small English cucumber, peeled and diced (about three cups)
1 large ripe, but green Hass avocado, peeled and diced
1 garlic clove, minced
2 tbsp minced dill leaves, plus more for garnish
1/3 cup cashew cream
3/4 cup water
1 1/4 cup freshly squeezed or unpasteurized orange juice
2 tsp sea salt (more or less to taste)
1/8 tsp freshly ground black pepper

Method:
  • Soak 1/2 cup cashews overnight or for at least four hours in filtered water.
  • Drain water and place cashews in a blender and add fresh filtered water to cover.
  • Blend on high for about 3-4 minutes until creamy, adding additional water if too thick.  Set aside.
  • In a food processor add cucumber, avocado, garlic, cashew cream and water and blend until smooth, scraping down sides and blending again.
  • Add orange juice, dill and salt and pepper to taste and blend again.
  • If to thick add additional juice or water to thin.
  • Chill in the refrigerator for at least two hours for flavors to combine.
  • Once chilled taste again for salt and pepper.  As ingredients become colder they lose flavor so you may need to adjust the seasonings.
  • Garnish with dill springs and cashew cream.
I served the soup with a mesclun salad with shaved raw beets, orange segments, and raw pumpkin seeds with an aged-sherry vinaigrette.  Really fresh and delicious!

Wednesday, August 3, 2011

Mediterranean Quinoa Stuffed Tomatoes

So yesterday was Day 1 of the Crazy Sexy Diet Cleanse Program that I'm following over the next three weeks.  In the morning you're supposed to drink a glass of filtered water with a squeeze of fresh lemon juice and cayenne pepper, followed by a cup of herbal tea.  Well, I made the mistake of drinking a cup of decafenated Green Tea, instead of herbal, which made me kind of sick to my stomach, but once I made my green juice drink, everything was fine and following the program throughout the day was pretty uneventful.

I probably ate about 70 percent raw foods yesterday.  It would of been higher if I would of planned my meal(s) a day in advance.  I'm so used to driving to the grocery store and formulating my grocery list on the way there.  But eating a raw-live diet requires advance planning because a lot of the ingredients require soaking, sprouting or dehydrating prior to use.  Anyway, dinner was really great and hubby loved it.  He said that it was so fresh and flavorful--just what I like hearing.  Also, kitchen clean-up was a breeze, no dirty pots and pans to clean!


So here's what I ate/drank yesterday:

Breakfast/Morning:

8 oz glass of filtered water with a squeeze of lemon juice and a pinch of cayenne pepper
8 oz cup of Green Tea, recommend herbal as the book states...:-)
16 oz freshly juiced green drink (1 apple, 1 cucumber, 1 celery stalk, 1 broccoli stalk, 1 small carrot, 4 stalks kale, 1 serving Amazing Grass (optional), 2 tbsp ground flaxseed (optional)

Lunch/Mid-Afternoon:

1/2 cup olive hummus (2 cups cooked cannellini beans, 1/4 cup tahini paste, 1 garlic clove, 1/4 cup pitted black olives, 1/4 cup pitted green olives, 1 tbsp extra virgin olive oil, juice of 1 lemon, salt and pepper to taste
1/4 cup each of raw broccoli, carrots, zucchini, and cherry tomatoes
2 oz freshly juiced wheatgrass, around 4:00pm

Dinner/Evening:

3 Mediterranean Stuffed Tomatoes with Sun-Dried Tomato Vinaigrette, recipe below
2 Medjool dates...couldn't resist...

Also, throughout the day I drank about 1.5 liters of filtered water and I also went for a 45 minute walk.

Mediterranean Quinoa Stuffed Tomatoes:
(Serves 2)

6 organic beefsteak tomatoes, cored, tomato seeds and pulp removed, reserved
2 1/2 cups cooked or sprouted pearl quinoa, see note below
1/3 cup currants
1/3 cup pinenuts
2 tomatoes, seeded and diced
2 tbsp minced fresh parsley
2 tbsp minced fresh mint
1 cup finely chopped organic spinach
Juice of 1 lemon
Sea salt and fresh black pepper to taste
Note:  I cooked 3/4 cup quinoa to yield 2 1/2 cups cooked for the recipe.  If you have time and you want the entire dish to be raw, then soak the quinoa for about two hours, rinse and place in a sprouting jar for 24 hours, rinsing and draining regularly until seeds sprout.

Method:
  • Cut tops off tomatoes and using a spoon, remove seeds, pulp and juice.  Reserve seeds, pulp and juice and place in a blender or food processor and blend until smooth.  Strain the tomato juice into a bowl.  You should have about 1 1/2 cups juice that you'll need for the sun-dried tomato vinaigrette.
  • In a medium bowl, add cooked or sprouted quinoa, along with other ingredients.  Season with salt and pepper to taste and chill for about an hour before stuffing tomatoes.
Sun-Dried Tomato Vinaigrette:

1/2 cup rough chopped sun-dried tomatoes (not in olive oil)
1/4 cup pitted Kalamata olives
1 1/2 cups tomato water (if you have less then just use filtered water)
Juice of 1 lemon
1/4 cup cold-pressed extra virgin olive oil
Sea salt and black pepper to taste
1 garlic clove, finely minced
1 tbsp minced fresh basil

Method:
  • To a food processor or blender, add tomatoes, olives, tomato water and lemon juice and blend until smooth.
  • With motor running, stream in extra virgin olive oil until emulsified.  If too thick add additional water and season with salt and pepper to taste.
  • Pour into a bowl and stir in minced garlic and basil.
To assemble tomatoes, slice off a small slice on the bottom of each tomato so that they stand upright on the plate.  Using a small spoon, fill each tomato with quinoa and press to pack filling.  Drizzle with sun-dried tomato vinaigrette and garnish with fresh basil.


ShareThis