Showing posts with label Appetizers. Show all posts

Tuesday, May 27, 2014

Deviled Goodness (Vegan Deviled Eggs)

You can't have a holiday weekend without serving Vegan Deviled Eggs.   Seriously these are amazing!  My husband could not get over how much they tasted like the real deal, texture and everything.  As I mentioned in previous posts, I have never liked eggs (no matter how they were prepared)...but with one exception...my Mom's Deviled Eggs.  Everything she made tasted great and I think that she would love these too!

https://farm6.staticflickr.com/5160/14283368091_faaf1cbc15_b.jpg

This recipe is so simple, but you'll need a mold to create the cashew-agar base to hold the piped tofu mousse.  I used a ceramic deviled egg holder that I had in cabinet, but it was a little shallow.  I'm going to look on line and see if I can find a deeper base, but other than that they were absolutely perfect...beautiful and delicious.


This recipe makes about 36 portions so you will need more than one mold because the agar will solidify if you don't work quickly.  Or you can cut the tofu mouse recipe in half and pipe less.

Cashew Cream-Agar Egg Base:

1/2 cup cashew cream, (1/2 cup cashews blended in a high speed blender with 1-1/4 cup water.  If you don't have a high-speed blender then you will need to soak the cashews for about 4 hours and then strain through cheesecloth or a fine strainer.  You will not use all the cashew cream but it will keep in the refrigerator covered for up to five days.)
3/4 warm water
1 tsp Agar-Agar powder (I purchased my powder at an Asian market, for $2.99, but Whole Foods carries the agar flakes, but it will cost you about $9.00.  Also, if you use the flakes then you'll need to increase the amount to 1 Tbsp and boil it a little longer.
1/4-1/2 tsp Black Salt (found in an Indian or Asian market--it's actually pink and very salty.)

Method:  
  • Lightly oil mold with vegetable oil and set aside.  
  • Blend cashews with water and measure out a 1/2 cup of cashew cream.  Whisk in black salt and set aside.
  • Pour 3/4 cup water into a measuring cup and warm in the microwave for 30-40 seconds.  Whisk in agar-agar powder and then place back in the microwave for 1-2 minutes and let it boil.  
  • Place cashew cream into microwave for 30-40 seconds to warm and then whisk mixture into hot agar water making sure there are no lumps.
  • Skim off any bubbles off the top before pouring into mold, or pop bubbles with a toothpick.
  • Let mold sit on the counter for about 15 minutes before moving and placing in the refrigerator to chill for about one hour to harden completely.


Once hardened, using a small pairing knife, remove cashew-agar base and place on a plate.  Then using a small melon baller or spoon, scoop out a small portion of the base without breaking through the bottom.  Then pipe in the tofu mousse and chill for about an hour before serving.  Also, the agar will not melt or soften if these are left out for a little while at room temperature, but they are better served chilled.  So if you are serving a lot of people, I would serve a dozen at a time and keep the others chilled.

Tofu Mousse:
(You can cut the recipe in half if you are making less portions)

7.5 oz organic sprouted extra firm tofu (I used Wildwood--it comes it two sealed pouches, 7.5 oz each).
1/4 cup Follow Your Heart original organic Vegenaise
2 tsp spicy brown mustard
1 tsp turmeric powder
1/2 - 3/4 tsp black salt
1 tsp apple cider, or white wine vinegar

Method:
  • Drain tofu and press dry with paper towels and place in a food processor.
  • Add all ingredients except for black salt and blend until smooth and creamy.  You may need to add a little more Vegenaise to get the right texture.
  • Add black salt to taste and then pipe or spoon mousse into base.
  • Garnish with paprika and chives and chill for about one hour before serving.


Friday, January 24, 2014

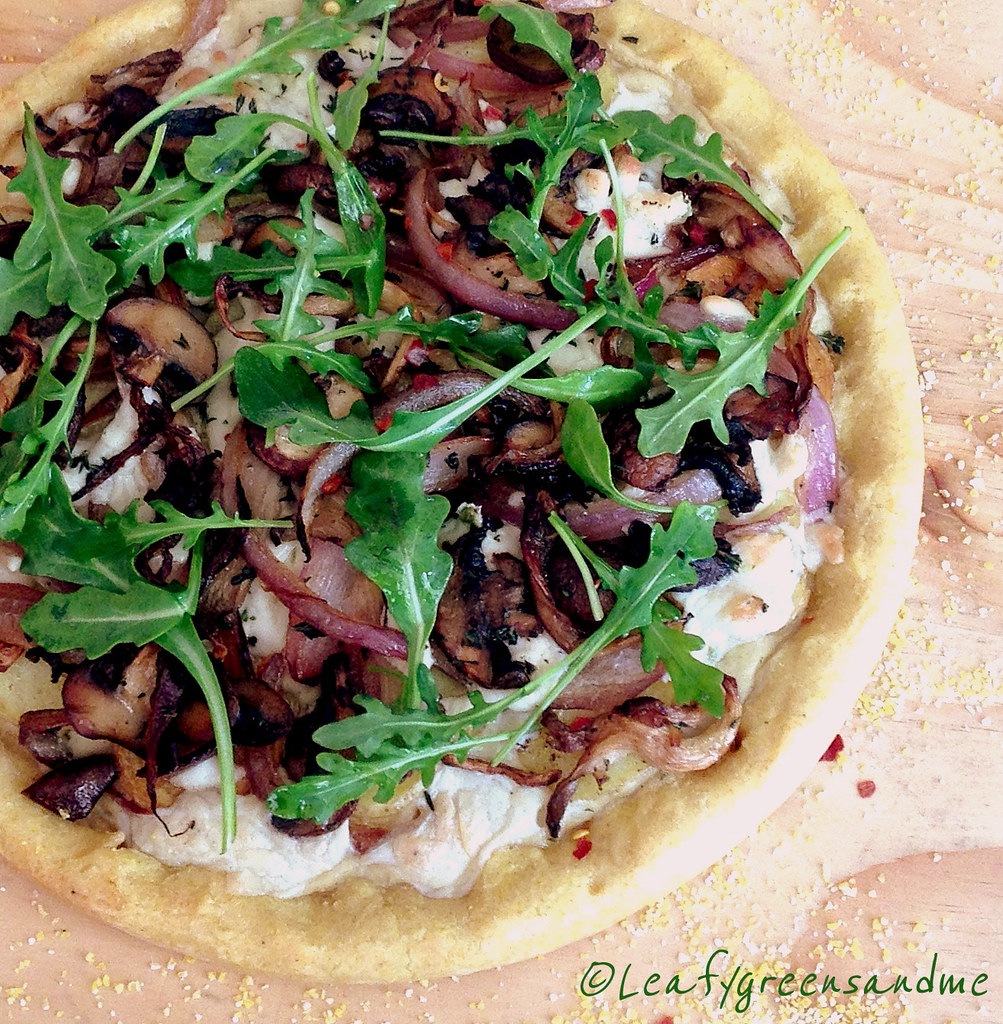
Roasted Wild Mushroom Pizza Blanco

I never got my oven fixed last week but when I turned it on the other night it worked perfectly.  I'm sure eventually I'll need to call in the repair guy, or get a new one, but until then it's nice not having to spend the $100 plus!  I'd rather spend the money on quality ingredients to make delicious food!

For this pizza I used a gluten free cornmeal crust.  I really didn't like the crust that much...it was chewy and didn't brown properly and I much prefer an extra-thin crispy crust for my pizza.  I do like using gluten free pizza crusts, but this was not one of them.  However, the toppings were amazing! Here's what I did:

http://farm8.staticflickr.com/7391/12125213085_838ce18314_b.jpg
  
I pan roasted both cremini and oyster mushrooms in olive oil, fresh thyme and salt and pepper until lightly golden brown.  While the mushrooms were roasting, I caramelized sliced red onions in olive oil and set aside.  I then sliced baby creamer potatoes about 1/8" thick and sauteed them in olive oil until golden brown.  

To assemble the pizza, I brushed the dough with extra virgin olive oil and then spooned about 1/3 cup of my homemade creamy pasta alfredo sauce on the bottom.  I topped the sauce with one cup of shredded Daiya Harvarti Style Cheese Wedge, followed by the roasted mushrooms and then the onions.  After baking the pizza I topped it with fresh arugula tossed in a little evoo, s&p, and finished with a sprinkle of crushed red pepper flakes.

If you make the alfredo sauce the day before and purchase a pre-made pizza crust, then this is an easy Friday night dinner after a long week at work!  And it was delicious!  Now I've got to figure out what I'm making for tonight...stay tuned...will post this weekend! 

Happy Friday! 

Monday, January 20, 2014

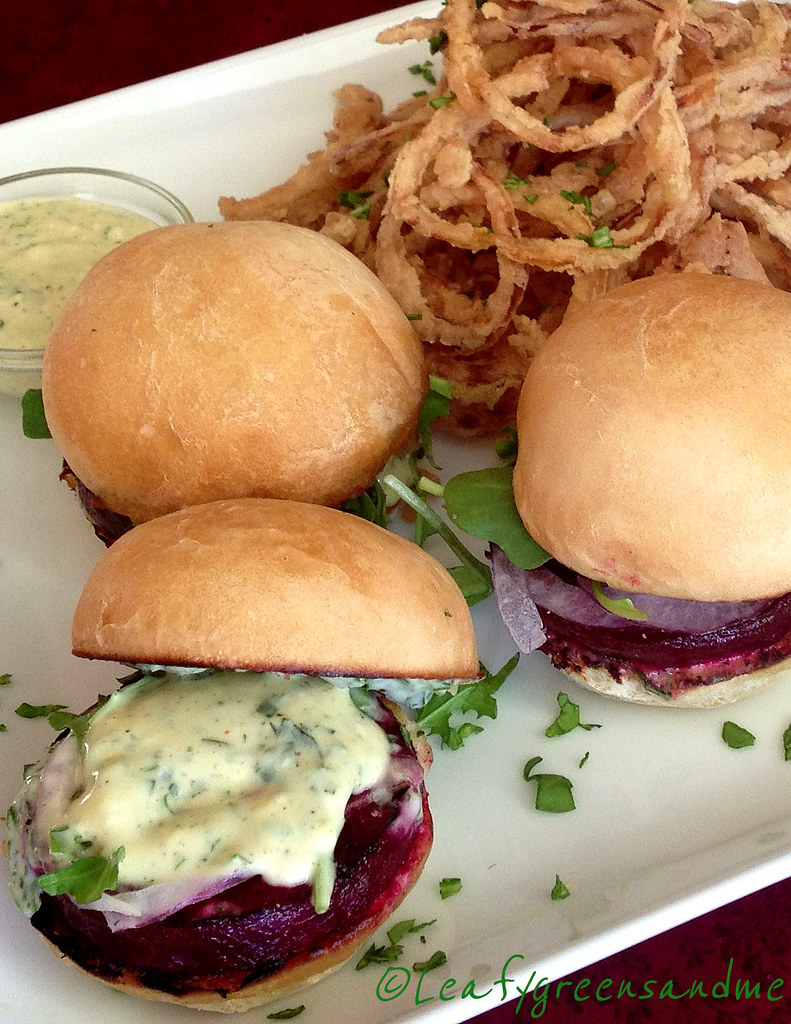
Beet Sliders with Dill Aioli and Crispy Onion Strings

I have made vegan burgers with just about every ingredient combination you can imagine (beans, mushrooms, rice, lentils, tempeh, TSP, nuts/seeds, gluten, etc.) and the texture is always off.  They are very flavorful but they tend to be either mushy, gummy, crumbly, or dry and so when I saw these Beet Sliders featured on Diner's, Drive-In's and Dives the other day, I knew that I had to make them for the 49ers vs. Seahawks game yesterday.  (Just a side note--bummed that the 9ers lost...:-(, but go Denver--I like Payton Manning--he's a classy guy!)  Did you happen to notice that my sliders are the same colors as the 49ers uniforms...:-)!

http://farm4.staticflickr.com/3782/12061100395_21b6a17888_b.jpg

Anyway, back to the sliders.  I served these with two sauces:  a Dill-Green Goddess Aioli and a Tarragon-Spicy Mustard Aioli.  The dill aioli was the favorite, but the tarragon-mustard was a close second--such a classic combination.  To make the aioli dressings I used 1/2 cup Vegenaise and a 1/4 cup sour cream in each bowl.  I then added finely minced dill, green onion and parsley to one bowl, and finely minced tarragon and spicy brown mustard to the other bowl.  I added fresh lemon juice, salt and pepper to each and whisked until smooth.

For the sliders, I purchased beets that were about 3" in diameter, all about the same size and I poached them in a liquid made up of:  water, diced onion, carrots, celery, garlic cloves, fresh dill, fresh thyme, bay leaf, coriander seed, caraway seed, black peppercorns, and salt.  I simmered them for about 1-1/2 hours until tender, let them cool, peeled them and with a 2-1/2" cookie cutter cut them the same size 1/4" thick.  Before serving, I seared them in olive oil, salt and pepper, which gave them a great texture.

The most difficult part about these sliders was locating the perfect size and textured bun.  I went to Whole Foods, Trader Joes, Safeway and Lucky's and I purchased three different bags of buns, which are now taking up my freezer.  I wanted them the exact size of my beets, but I didn't want the bread to be too dense.  It all worked out and the beet to bun ratio was perfect! 

Finally, I shaved red onion very thin on a mandolin and topped each slider with onion, arugula and aioli of choice.  I was thinking about serving them with fries but went with the crispy onion stings.  I used one large sweet Maui onion (serves 2-3 people), shaved thinly on a mandolin and set up a dredging station (wet:  2 cups almond milk with 1/4 cup hot sauce, dry:  2 cups flour, 1/4 cup cornstarch, salt and pepper).  Using a candy thermometer, I heated 1 qt canola oil to 380 degrees and deep fried the onion strings until golden brown, drained on paper towels and sprinkled with sea salt!

These were so yummy and so easy to make that I will probably never go back to making burgers the other way!    


Friday, January 10, 2014

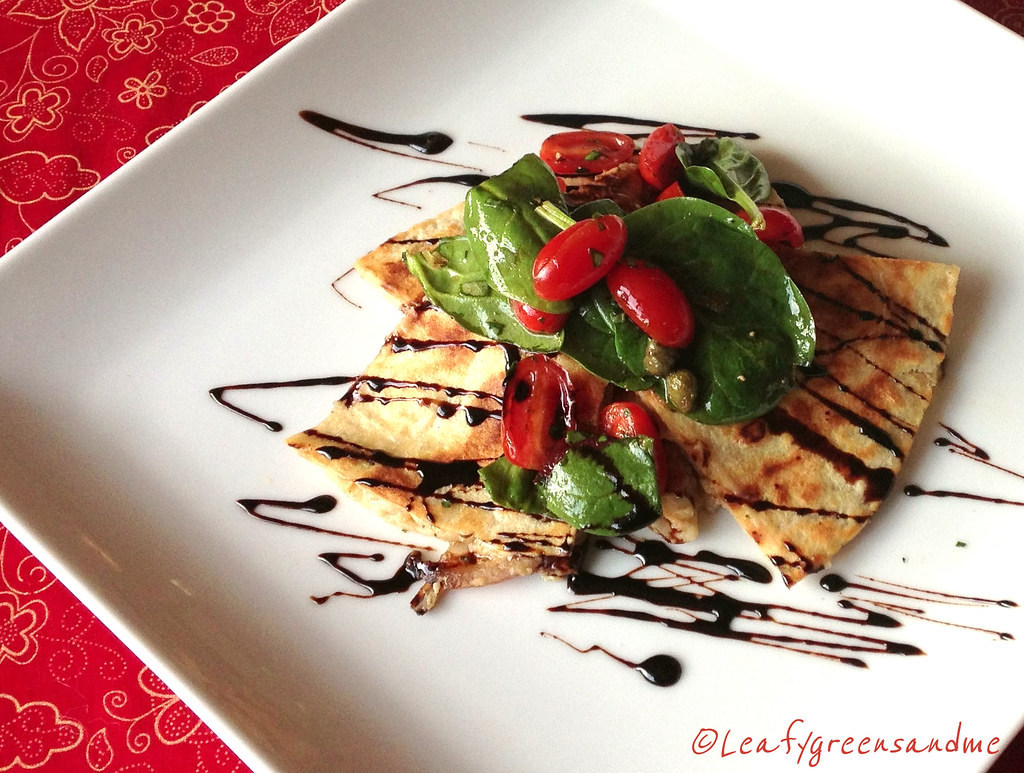
Tuscan White Bean Quesadilla with Balsamic Glaze

On Friday I'm always looking for a quick and easy dinner and this couldn't be simpler.  You can make the white bean spread from scratch or doctor up your favorite white bean hummus.  The key to this quesadilla is to make sure that the bean mixture is firm so that it is easy to cut.  

http://farm6.staticflickr.com/5522/11881189676_26a0294e60_b.jpg 

Top with a marinated salad of cherry tomatoes, arugula, capers and kalamata olives or eggplant capanata and drizzle with balsamic glaze. 

Ingredients:

1 can cannellini beans, rinsed, drained and dried really well with a towel
1 tbsp extra virgin olive oil
1 large onion, diced small
3 cloves garlic, minced
1 tsp dried Italian seasoning, or 2 tsp fresh herbs (rosemary, thyme, oregano, fennel), minced
Pinch crushed red pepper flakes
1/2-1 tsp grated lemon zest
Kosher salt and pepper to taste
Whole wheat tortillas
1 package Daiya Havarti Wedge Cheese, shredded
Balsamic Glaze
Tomato-Caper-Olive Arugula Salad

Method:
  • Saute onion, garlic and Italian seasoning and red pepper flakes until soft.
  • In a food processor, process beans until mostly smooth, adding 1 tbsp of bean fluid or water.
  • Remove bean mixture place in a bowl and stir in onion mixture and season with salt and pepper to taste.
  • Add shredded cheese, bean mixture to tortilla and saute until golden brown. 
  • Cut into wedges and garnish with balsamic glaze and salad.
Happy Friday!  


Saturday, July 28, 2012

Spicy Potato & Coriander Samosas

I love Indian food, but I hardly ever order it out at a restaurant because it's very hard to know which entrees use ghee and which use vegetable oil.  There is a small Indian market near my house and I sometimes will drop by on my way home from work and order their Chana Masala and Vegetable Biryani (both are made fresh daily and use vegetable oil), along with a couple of their potato and pea samosas.  Now, I normally don't eat fried food, but every now and then, I can't pass up a good samosa.


I learned how to make samosas while working as a Chef in 2008.  We had a 200 person dinner party and they requested 25 platters of samosas as one of their appetizers.  I only had about three days before the party to make 500 samosas and so I was panicked to say the least.  But the wife of my husband's co-worker came to my rescue and gave me a quick lesson, along with her delicious recipe and I have been happily making samosas ever since.  And they were such a hit that we placed them on the menu permanently.   

Making the dough couldn't be easier (it includes, a/p flour, vegetable oil, water and salt) and once you get the hang of rolling and stuffing the samosas, it goes by very quickly.  A good samosa dough should puff up with little bubbles when fried and be crispy out the outside--never greasy or soggy, even after sitting out at room temperature.


The filling for the samosa should be fluffy, spicy and flavorful.  I have never tasted a filling that compares to the recipe that she shared with me.  I use russet potatoes, green chilies, ginger root, garlic, amchur powder, turmeric powder, red chili powder, garam masala, crushed coriander seeds, chopped fresh coriander (cilantro) and sea salt.  And I always serve my samosas with a cilantro-mint sauce and tamarind-date chutney.  Both sauces provide a nice contrast (sweet and cooling) to the spicy samosas.  

Too bad that samosas are deep fried or I would probably eat them everyday!  But once or twice a year seems to satisfy my craving and all is good in the world, or at least in my kitchen! 


Sunday, February 19, 2012

Pickled Beet Salad with Fennel-Orange Vinaigrette

Growing up my mom always had pickled beets in the back of the refrigerator.  Unfortunately she combined them with eggs in a large jar, but I avoided the eggs and went for the beets.  I always felt that it was a strange combination (pickled beets and eggs), but I guess it was her German upbringing. 


Lately, I can't get enough of beets.  I just love their earthly flavor and vibrant color and they go really well with fennel and orange.  Also, when you pickle them it gives them a nice tang, which compliments their earthiness and brings out their natural sweetness.  This salad is beautiful and can be served any time but is a really nice first course to serve to impress your dinner guests.  Normally, I would make this with both red and golden beets and alternate the beets on the plate, but the market only had red at the time.  Whatever color beets you use, it's still a beautiful salad and absolutely delicious!


Wednesday, February 8, 2012

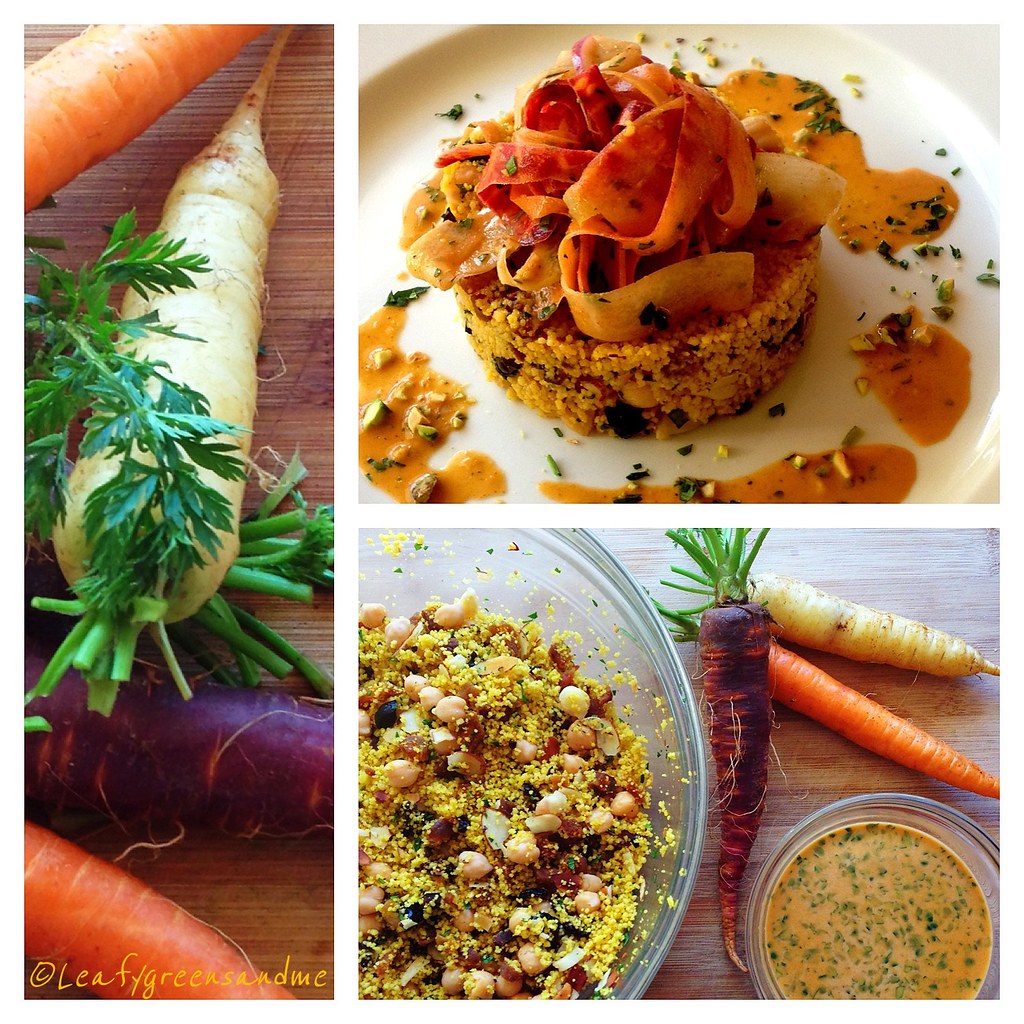
Moroccan Carrot Salad with Saffron Couscous

We are having beautiful spring-like weather in the Bay Area--68 degrees today and 72 tomorrow and I have spring-fever big time!  Spring always reminds me of carrots and so I couldn't pass up getting a bunch of beautiful tri-color (purple, cream and orange) carrots at the market today.


With carrots this sweet and tender I didn't want to cook them and so I shaved them into thin ribbons and tossed them with a Moroccan Vinaigrette made with freshly squeezed orange juice, lemon juice, sherry vinegar, cumin, coriander, paprika, ginger, garlic, cilantro and olive oil.  I then made a whole wheat couscous with saffron, dried apricots, almonds, pistachios, oil cured olives, preserved lemon and chickpeas.  So easy, fresh and delicious--perfect for a day like today!

Monday, January 30, 2012

Spicy Black Bean Tacos with Chipotle Crema

These mini tacos are just too good!  My husband and I had like nine each for dinner on Friday night and then finished off the rest for lunch on Sunday.  I made the corn tortillas from scratch and you can really taste the freshness of the corn--so much better than the store bought version! 


For the spicy black beans and brown basmati rice, I cooked both the rice and the beans with an adobo spice blend.  I make all my own spice blends and I made this quite some time ago.  I don't remember the exact recipe ratio but it contained:  paprika, ancho chili powder, garlic powder, onion powder, coriander powder, cayenne pepper, dried oregano and salt and pepper.  If you don't want to go through the trouble of making your own spice blend then you can just use 1-2 tbsp chili powder or a taco seasoning blend.  Also Mexican markets carry an already pre-made adobo spice blend, but I find it to be a little bland.

I then made my own roasted tomato salsa, guacamole and a red and green cabbage salad with cilantro and lime juice.  I topped off the tacos with a cashew chipotle crema made with blended cashews, sun-dried tomato paste, paprika, garlic powder, chipotle powder, lime juice and salt and pepper.

I could eat these everyday--so healthy and delicious! 

Friday, January 27, 2012

Homemade Corn Tortillas & Roasted Tomato Salsa

I'm going to make this short and sweet because tonight is Mexican night and I absolutely can't wait to eat my mini tacos.  I made homemade corn tortillas (really simple and delish), as well as roasted tomato salsa.  I'll be serving my tacos topped with spicy Mexican rice, black beans, cabbage salad, guacamole, homemade salsa and chipotle crema!  I'll post photos and recipes tomorrow, along with my famous Pomegranate Margarita recipe.  Well at least it's famous in my household.  For the past two weeks I was away visiting my family in Maryland and my sister who doesn't drink alcohol at all was practically asking for margaritas every night...sorry Dana the truth is out!  And I think one is calling my name right now!


Roasted Tomato Salsa 


6-8 Roma tomatoes, roasted (see link)
3-4 Roma tomatoes, blanched, skins removed and grated
1 Jalapeno, roasted, skin and seeds removed
1 tsp garlic powder
1 tsp cumin powder
1 Jalapeno, seeds removed and finely minced (about 2 tbsp)
3 tbsp finely minced onion
1-2 tbsp minced cilantro
Juice of 1-2 limes (depending on size)
Kosher salt and black pepper to taste

Method
  • Preheat oven to 450 degrees, slice tomatoes, toss in a little olive oil and salt and pepper and roast for 1 hour until caramelized.  Remove from oven, let cool and remove skins.
  • During this time add the jalapeno and roast for 10 minutes.  Remove from oven and remove skin and seeds.
  • Place roasted tomatoes and jalapeno in a food processor and blend until smooth.  Place in a bowl.
  • Blanch remaining tomatoes for 1 minute, remove skins and grate on a box grater and add to roasted tomatoes.
  • Add remaining ingredients, season with salt and pepper to taste and chill until ready to use. 
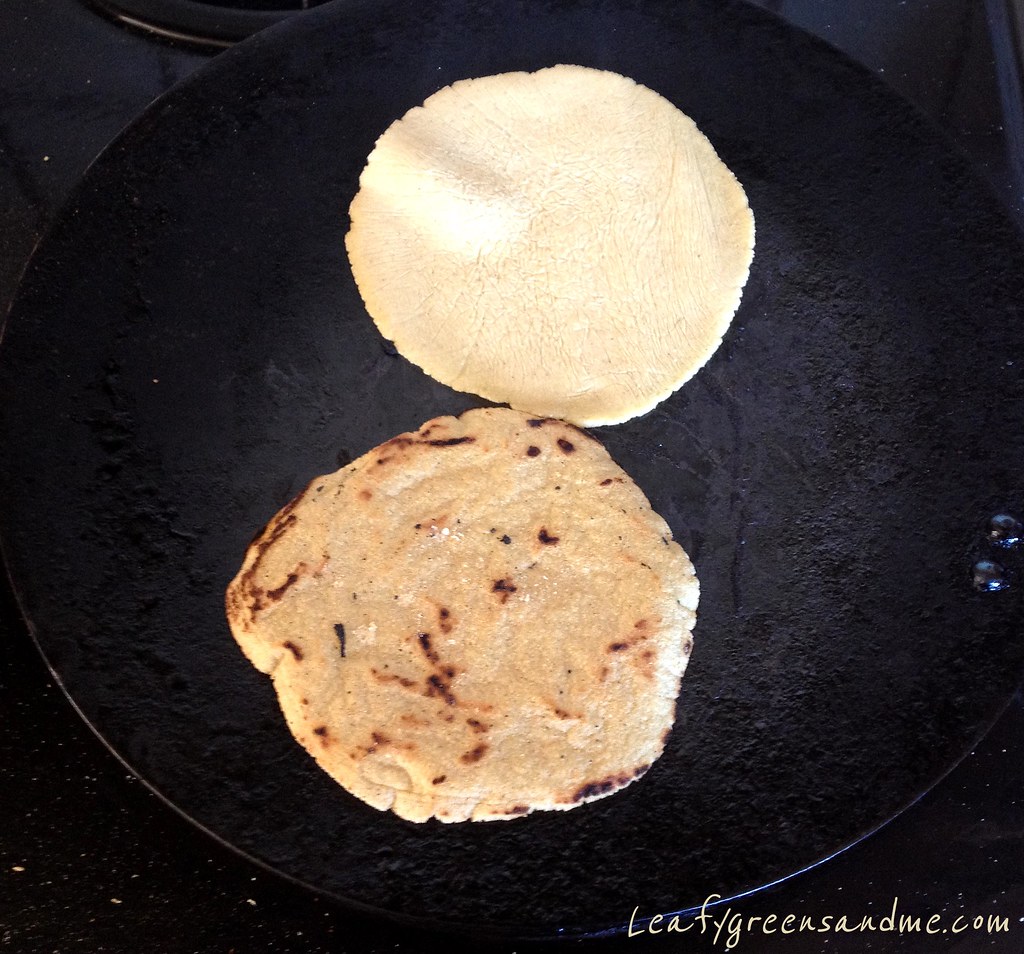
I don't know why I stopped making my own corn tortillas from scratch.  The texture and flavor is so much better than what you purchase at the store.  Yes, it takes about one hour from start to finish, depending on how many you make but it is so worth it.  This recipe made 24 small 5-6" tortillas.


I used 2 cups of masa and 1-1/3 cups of water.  You don't need a tortilla press--just a rolling pin and two sheets of plastic wrap coated with masa flour.  I also prefer smaller tortillas and so I used a small ice cream scoop to portion the masa.  The most important tip is to keep the masa covered with plastic while rolling out the tortillas.  Also, as you remove the cooked tortillas from the grill pan, wrap them in a kitchen towel to keep warm until all tortillas are done.


Also, no oil is needed in the pan.  Just make sure that you use a cast iron skillet or griddle because you need to cook them on medium-high heat and the more charred the better!  Cook them for about 1 minute per side and then wrap in a kitchen towel to keep warm.  Enjoy!


Friday, November 11, 2011

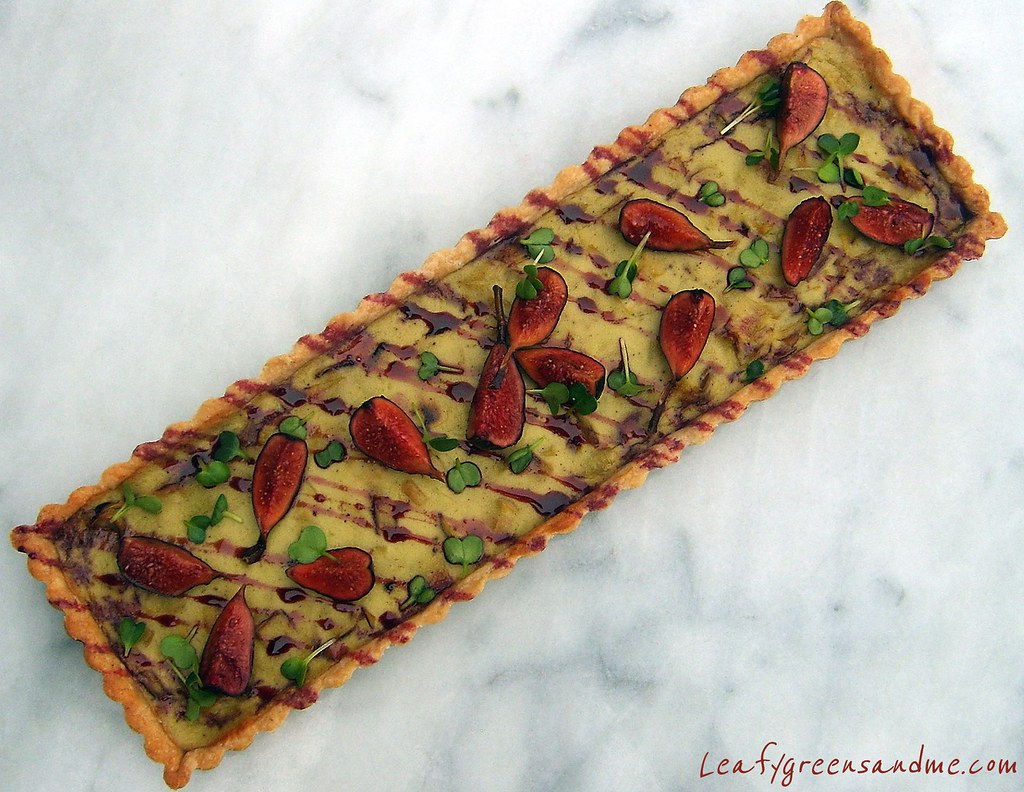
Cauliflower-Leek Tart with Port Glazed Figs

When I graduated from Culinary School I wanted to open a tart shop and serve savory and sweet tarts as well as soups, salads and baked goods.  Unfortunately, I never opened my tart shop, but instead went to work for a restaurant and worked my way up the ranks.  Several months after I was hired and during the busiest month of the year (December), the pastry chef quit and I took over her position until they could find a replacement.  By the way, they didn't find a replacement until the following April--but that was fine by me because it was a great learning experience.  My favorite part about the pastry position was making tarts, both sweet and savory...and I made a lot of them during that time!


One of the tarts we served that was a favorite by customers was a herbed-goat cheese and leek tart.  It was on the menu for the entire five years I was there.  We tried taking it off but customers always requested it and so it stayed.  Since switching to a vegan diet, I've always wanted to recreate this tart, without the goat cheese of course, and so I substituted a creamy cauliflower puree and it's just as delicious or even better than I remember.  It's also a beautiful tart and will make a great presentation at your Thanksgiving dinner or anytime you entertain.   


Cashew Cream:

1 cup raw cashews, soaked overnight in filtered water, drained
2 cups filtered water

Method:
  • Drain cashews and place in a blender, add water and blend until smooth for about 4 minutes.  If you don't have a high-speed blender, like a Vita-Mix, strain the cream and set aside.  You'll need 1 1/2 cups cashew cream for the recipe.
Flaky Pastry Crust:

1 1/4 cups whole wheat pastry flour
1 1/4 cups unbleached white flour
12 tbsp Earth Balance Vegan Buttery Sticks, diced, frozen
4 tbsp Earth Balance Natural Shortening, diced, frozen
1 tsp kosher salt
1 tsp unbleached sugar
1/4-1/2 cup cold filtered water

Method:
  • Add flour, salt, sugar to a food processor and pulse to combine.
  • Using the pulse mode add butter and shortening and pulse until the texture is crumbly and the fat resembles small peas.
  • While still in pulse mode, drizzle in water slowly until dough sticks together when pressed in your hand.
  • Remove dough from bowl and place on a cutting board and form into a 1" high flat disk/circle or rectangle, depending on the shape of your tart pan.
  • Wrap in plastic wrap and chill for about an hour.
  • Preheat oven to 400 degrees.
  • Remove dough and place on a lightly floured cutting board and roll out to about 3/8" thick in either a rectangle or circle depending on your tart pan.
  • Place dough in tart pan pressing along the bottom and edges and remove excess dough from the edge.  Prick dough about six times with a fork and place tart in the freezer for about 30 minutes.
  • Remove tart from freezer and line with foil or parchment paper and fill with baking beans.
  • Place tart pan on a sheet pan and bake in the oven for 20 minutes, rotating half way through the cooking process.  Remove foil/parchment and baking beans and bake 5-7 minutes longer.
  • Remove from oven and set aside to cool.
Sauteed Leeks: 

1 large leek, white and light green parts only, diced and washed
1 tbsp extra virgin olive oil
Kosher salt and black pepper to taste

Method
:

  • Saute leeks in olive oil for about 5-7 minutes until tender.  Cook on a low enough temperature to keep the leeks light in color--you don't want to brown.
  • Place in a medium sized bowl and set aside to cool.
Cauliflower Puree:

2 cups roughly chopped cauliflower florets
1/2 yellow onion roughly chopped, about 1 cup
2 cups low-sodium vegetable stock
1 tbsp minced garlic
1 tbsp minced thyme
1 tbsp extra virgin olive oil
1 1/2 cups cashew cream
1 tbsp cornstarch
Kosher salt and black pepper to taste

Method:

  • Heat a saute pan on medium-low, add olive oil and onion and cook for a couple of minutes for onion to soften.
  • Add cauliflower, vegetable stock, garlic, thyme and salt and pepper.  Increase heat to medium and cook for about 20 minutes until all liquid is absorbed. 
  • Using a spatula, scrape cauliflower mixture into a blender and add cashew cream and cornstarch.
  • Blend on high until smooth and creamy and season with salt and pepper if needed.
  • Add 2 cups of blended cauliflower puree to the sauteed leeks and stir to combine.
Assembly:
  • Turn down oven temperature to 350 degrees.
  • Spoon cauliflower-leek mixture into prepared tart shell and place on a baking sheet.
  • Bake in the oven for about 20-25 minutes, rotating half way through the cooking process, until firm to touch and tart shell is lightly golden brown.  If tart shell starts to get too brown, cover edges lightly with foil.
  • Remove tart from oven and let cool for about 15 minutes on a rack before removing tart ring.
  • Just before serving, drizzle with port glaze and garnish with sliced figs and micro arugula or micro greens.
Ruby Port Glaze:

2 cups ruby port
2 tbsp agave syrup
1/4 cup ripe figs, quartered

Method:
  • Add ingredients to a small sauce pan and reduce on medium heat until it turns into a syrup and coats the back of a spoon, about 20 minutes.  Mixture will thicken as it cools.  You want it to be thicker than maple syrup, but not as thick as molasses.
  • Slice figs and toss lightly in syrup and then garnish tart.  Drizzle with extra syrup.


Thursday, November 10, 2011

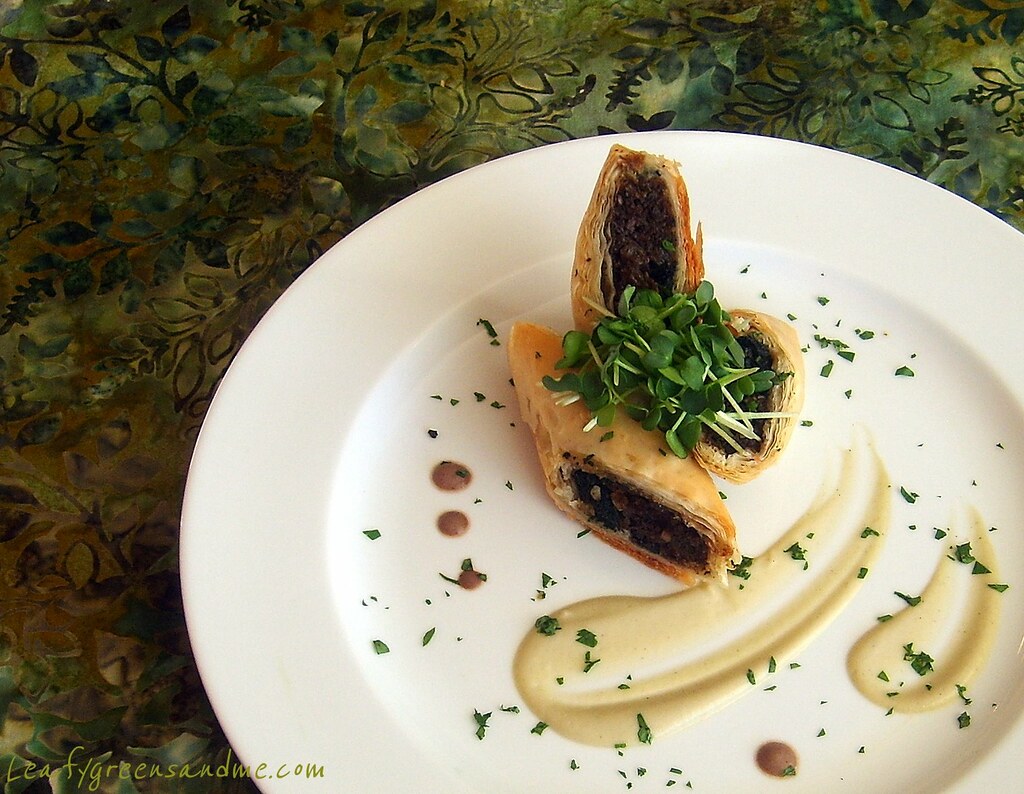
Mushroom Duxelles & Spinach Phyllo Strudel

This is a nice appetizer to serve your guests for Thanksgiving or anytime you entertain.  During the summer I make this with a Spanakopita filling and serve it with Tzazaki, but decided that a mushroom duxelles would be more appropriate for fall.  I served these with a cabernet sauvignon mushroom sauce, but a simple lemon aioli or porcini aioli would work just as well.   Also, you can shape the phyllo pastry into mini triangles or cigar shapes for a different presentation.
 

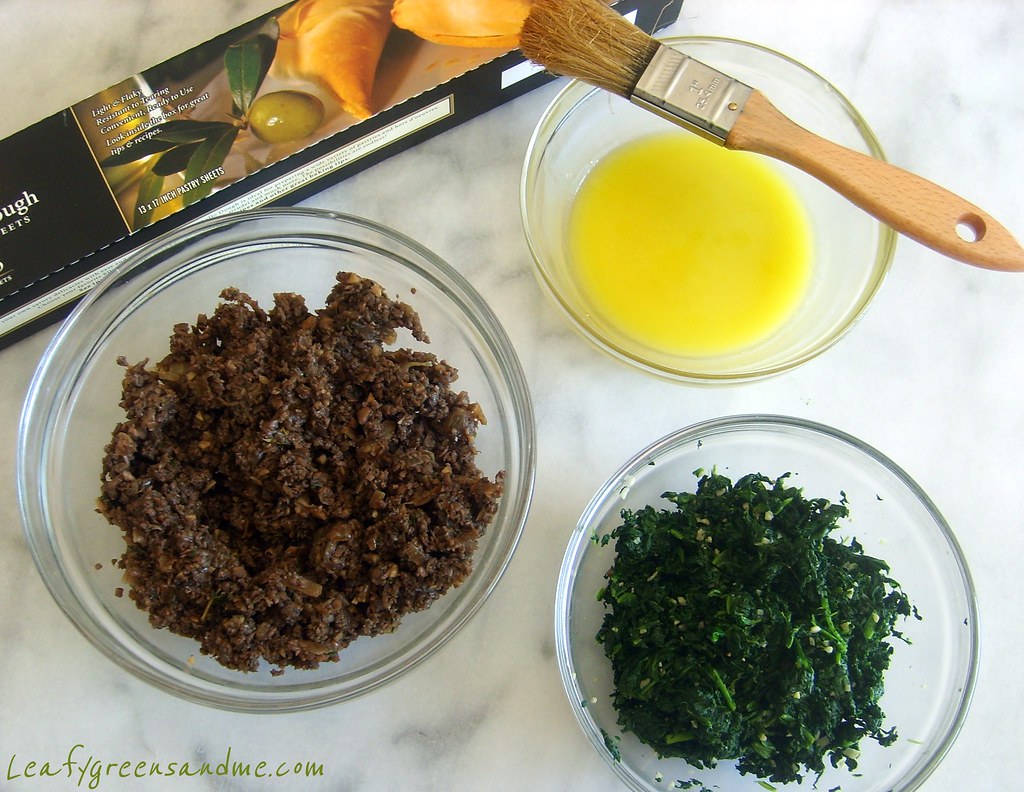
Mushroom Duxelles Ingredients:

1 lb cremini mushrooms, washed and roughly sliced
1 medium yellow onion, finely diced
2 tbsp finely minced garlic
1 tbsp finely mined fresh thyme
1/2 cup Maderia wine
2-3 tbsp extra virgin olive oil
Kosher salt and black pepper to taste

Method:

  • Place sliced mushrooms in a food processor and pulse until finely minced, be careful not to puree them.
  • Heat a large saute pan on medium heat, add olive oil and diced onions and cook for about 10 minutes until onions are soft.
  • Add minced mushrooms, garlic, thyme and salt and pepper to taste and cook mushrooms until all the liquid is absorbed, stirring frequently.  This takes about 30 minutes.
  • Deglaze the pan with Maderia wine and cook for about another 30 minutes, stirring frequently until all liquid is absorbed and the mushroom mixture is sticking to the bottom of the pan.
  • Check for seasonings, remove from heat and cool to room temperature.

Sauteed Spinach
:


2 large bunches of organic spinach, roughly chopped and washed
1 tbsp finely minced garlic
2 tbsp extra virgin olive oil
Kosher salt and black pepper to taste

Method:
  • Heat a large saute pan to medium-low, add olive oil and garlic and cook garlic for a couple of minutes until it starts to sizzle, stirring and making sure that it doesn't burn.
  • Immediately add chopped spinach (you may not be able to add all of it at once until it cooks down), and salt and pepper and cook for about 3-4 minutes, stirring frequently.
  • Remove from pan and strain away liquid, pressing with the back of a spoon or spatula to remove excess liquid.
  • Wrap spinach in a dish towel and squeeze to remove any remaining liquid.
  • Place spinach on a cutting board and chop finely.
  • Cool to room temperature and set aside.


Other Ingredients/Assembly:
Makes 2 logs
 
1 pkg frozen phyllo dough, thawed overnight in the refrigerator
3 tbsp Earth Balance Vegan Buttery Sticks, melted
3 tbsp extra virgin olive oil
Kosher salt and black pepper

Method:
  • Preheat oven to 350 degrees.
  • Whisk butter and oil together in a small bowl.
  • Remove phyllo from package and unroll.
  • While working with phyllo, keep it covered with plastic wrap and a damp towel so that it doesn't dry out.
  • Working with one sheet at a time with the longest edge facing you, brush the entire surface lightly with the butter/oil mixture.
  • Repeat this process for a total of 4 sheets.
  • Divide the duxelles mixture in half and place mixture evenly along the bottom edge leaving about 1/2" boarder along the bottom and a 1" along the sides.
  • Divide spinach mixture in half and place on top of the duxelles mixture.
  • Sprinkle lightly with salt and pepper.
  • Carefully lift the bottom edge and roll the phyllo into a smooth log, brushing lightly with more butter mixture, until all the phyllo is wrapped.
  • Score the phyllo lightly on a bias at 1-1/2 - 2" intervals.  You should have about 9 pieces per log.
  • Place strudel logs on two separate sheet trays covered with parchment or silpats.  Bake in the oven for 16-20 minutes (depending on oven), turning/rotating trays half way through the cooking process until puffy and lightly golden brown.


Friday, October 7, 2011

Saffron Arancini with Romesco Sauce

Here's another great appetizer to serve during Thanksgiving or any time you entertain.  I usually don't like to deep-fry foods, but Arancini is great for entertaining because you can make them well in advance, freeze them and fry just before your guests arrive.  They also hold up really well at room temperature and do not become soggy.  However, I doubt that they will last that long because your guest will gobble them up in no time at all--they are really addicting and delicious!


Arancini are usually stuffed with cheese, but I did not add any to mine.  If you want to add cheese, Daiya PepperJack would be a good option.  Romesco Sauce is a Spanish sauce made with almonds, toasted bread and sherry vinegar.  If you don't have time to make the sauce, you can serve these with a Chipotle Aioli, or Roasted Garlic Aioli, which are both really simple to make.  Just add adobo sauce, paprika, and lemon juice to your favorite non-dairy mayonnaise and you've got a great tasting dip for your arancini.

Saffron Risotto Balls:

1 1/4 cup arborio rice
1 yellow onion, diced small
2 cloves garlic, minced
1/2 cup dry white wine (I used Pinot Grigio)
1/4 tsp saffron threads, crumbled and bloomed in the wine
1/2 tsp pimenton, (smoked paprika)
2 tbsp extra virgin olive oil
5-6 cups low-sodium vegetable stock, heated
1-3 tsp kosher salt
1/4 tsp black pepper

Method:
  • Crumble saffron threads and add to white wine.  Let sit for about 10 minutes to bloom.
  • In a large saute pan, add olive oil and saute onions and garlic until soft.
  • Add arborio rice and cook for about 2 minutes, stirring to coat the kernels.
  • Deglaze with saffron-white wine and cook until wine is reduced.
  • Add pimenton, 1-2 tsp kosher salt, and 1/4 tsp black pepper
  • Ladle in two cups of hot vegetable stock and stir frequently until stock is absorbed.
  • Add additional stock by the ladle until rice is completely cooked and all the liquid is absorbed.  Unlike when making risotto, you want the rice to be fully cooked (not al dente).
  • Check for salt again and add if necessary.
  • Remove rice from the pan and spread out onto a sheet tray and place in the fridge until cool, about 15 minutes.
Romesco Sauce:

2 red bell peppers, roasted, skins removed, seeded and sliced
1 small onion sliced
4 cloves garlic roughly chopped
1 can organic diced tomatoes
1/2 cup filtered water
1 slice toasted bread, crust removed
1/4 cup sliced raw almonds
1/4 cup extra virgin olive oil, plus 1 tbsp
2 tsp aged sherry vinegar
Kosher salt and black pepper to taste
Filtered water to thin if necessary

Method
:

  • In a medium size sauce pan, add 1 tbsp olive oil, roasted bell pepper, onion, garlic, diced tomatoes and water.  Bring to a boil and reduce to a simmer and cook for about 45 minutes until most liquid is absorbed and vegetables are soft.
  • In a small frying pan, add 1/4 cup olive oil and raw almonds and cook for a couple of minutes until lightly golden brown.  Add almonds and olive oil to tomato mixture.
  • Place ingredients into a food processor or blender, along with toasted bread, sherry vinegar and salt and pepper to taste.
  • Blend until smooth, check seasonings and chill ready to use.
To Assemble:

1 cup unbleached flour
6 tsp Ener-g Egg Replacer
1/2 cup water
3 cups panko bread crumbs
Kosher salt and black pepper
1 liter canola oil

Method:
  • Set up a breading station:  seasoned flour, egg replacer+water and panko bread crumbs.
  • Season each with salt and pepper.
  • Using a small ice cream scooper or a teaspoon, form risotto balls.
  • Working with five at a time, roll in flour, then egg replacer, then panko and place on a sheet tray.  This recipe makes about 34 risotto balls.
  • After you finish rolling all the balls, place in the freezer for about 15 minutes to firm up.
  • Using a deep pot and a deep-fry thermometer, heat canola oil to 350 degrees and fry arancini five or six at a time until golden brown.
  • Drain on paper towels and season with salt.
  • Serve arancini hot with romesco sauce.


Saturday, October 1, 2011

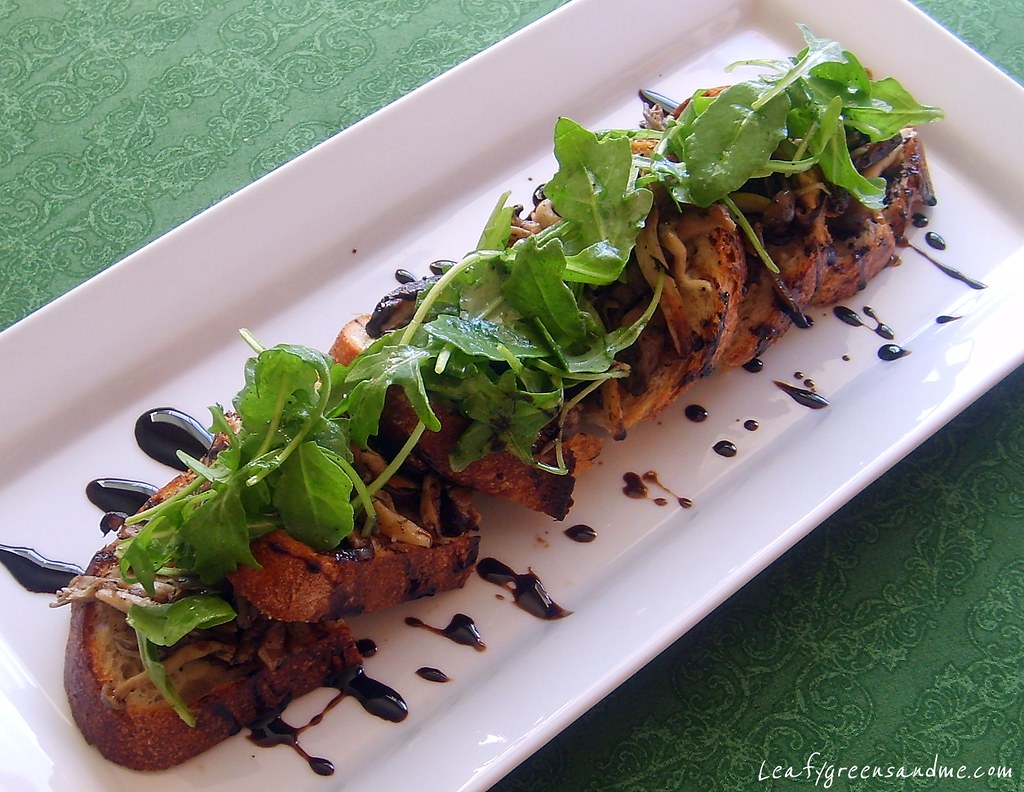
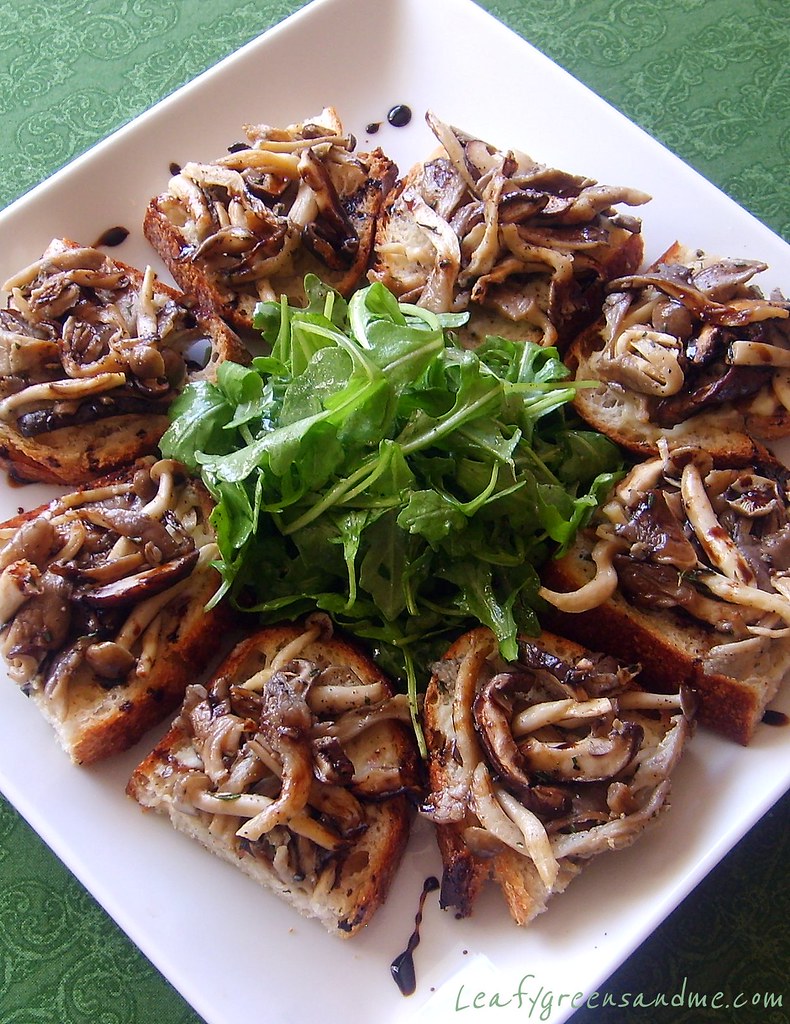
Wild Mushroom Bruschetta with Sweet Onion Soubise

To start off my Vegan Thanksgiving Series, I was going to talk about the foundation of all cooking, which is making a really good stock, but I decided that I didn't want to bore you right from the start.  So lucky for you my first dish is an appetizer that can be served on Thanksgiving or any time you entertain.


It doesn't matter how much I plan my Thanksgiving dinner--including a weekly time line, typed grocery list broken down by departments, or a detailed prep list, I am always running behind.  If I tell everyone that dinner starts at 5:00pm, I can guarantee you that it won't be on the table until 6:30pm.  On Thanksgiving most people skip eating breakfast and lunch in anticipation of gorging themselves at dinner.  So if you're a guest at my house you are going to be really hungry unless I serve you something to tide you over while I'm running late.  Now my husband is quite happy eating an entire bag of chips while waiting, but how good is that for you and there's no fun in it for me either since I enjoy cooking and serving delicious food! 

Serving this bruschetta is great because the sweet onion soubise and the balsamic glaze can be made up to three days in advance.  The mushrooms only take minutes to roast and if your oven is full with other items, you can always grill or toast the bruschetta.  Also, it can be served at room temperature--just don't dress the arugula until you're ready to serve or it will wilt.

 
Balsamic Glaze:
 
1 cup good quality aged Balsamic vinegar
1-2 tbsp agave syrup

Method:

  • In a small sauce pan over medium heat, cook balsamic vinegar and agave for about 15 minutes until it coats the back of a spoon.  You want it to be the consistency of molasses so be careful not to overcook it because as it cools, it will thicken and you want it to be pourable.
Cashew Cream:

1/4 cup raw cashews, soaked four hours or overnight
1 cup filtered water

Method:
  • Drain cashews, place in a blender, add water and blend on high for up to four minutes, depending on your blender.  Strain and set aside.  You'll need 1/3 cup for the recipe.  You can freeze the remaining cream, or add agave to it and serve it with your breakfast cereal.
Sweet Onion Soubise:

1 large yellow onion, sliced thinly
2 tbsp minced garlic
1 tbsp minced fresh thyme
1/3 cup white wine
2 tbsp extra virgin olive oil
1/3 cup cashew cream
Kosher salt and black pepper

Method:
  • Heat a small sauce pan on medium-low, add olive oil, onion, garlic and thyme and saute until onions are soft.  Do not brown the onions, you want them to remain light in color.
  • Deglaze with white wine and cook until reduced.
  • Add cashew cream and simmer, stirring frequently until onions are creamy and most liquid is absorbed.
  • Season with salt and pepper and place in a blender and blend on high until smooth.
  • Pour into a bowl and set aside, or store in the fridge until ready to use.
Roasted Wild Mushrooms:

1-1 1/2 lbs assorted mushrooms.  I used baby shiitake, oyster and brown enoki mushrooms
1 tbsp finely minced fresh thyme
2-3 tbsp extra virgin olive oil
Kosher salt and black pepper to taste

Method:
  • Pre-heat oven to 400 degrees.
  • Remove stems and slice shiitake mushrooms.  Rip oyster mushrooms into like size pieces.
  • Toss mushrooms in a bowl with thyme, olive oil and salt and pepper.
  • Place mushrooms on a sheet tray(s) and roast in the oven for 10 minutes until lightly golden brown, checking and turning the mushrooms half way through the cooking process.
Bruschetta:

1 loaf sour dough Italian Batard, sliced into 1/2" slices
Extra virgin olive oil for brushing
Kosher salt and black pepper to taste

Method:
  • Pre-heat oven to 325 degrees.
  • Brush both sides of bread lightly with olive oil and sprinkle with salt and pepper.
  • Bake in the oven for about 10 minutes, five minutes each side until slightly crispy.
Assembly:
  • Spread soubise on toasted bread and top with roasted mushrooms.
  • Slice bread in half and arrange on a serving platter.
  • Drizzle balsamic glaze over bruschetta and top with arugula, tossed lightly in lemon juice, olive oil, kosher salt and black pepper.  
  • Serve immediately.


Sunday, September 25, 2011

Deep-Fried Spicy Tofu with Ranch Dressing

I really try to eat healthy on a regular basis but sometimes I get cravings for the not-so-healthy-stuff...everything in moderation right?  While we were in Portland visiting family, we went to a restaurant and my husband ordered Tofu Buffalo Strips as an appetizer.  They were really good, but I knew that I could improve on the recipe.  So I decided to make my own version and they were really yummy...flavorful, spicy, crunchy on the outside, and soft as a pillow on the inside.  Totally addicting--dipping them in the ranch dressing and popping them in your mouth.  It will be a long time before I make these again, or at least until my cravings get the best of me!


For my ranch dressing recipe, click on the link.  To make the crunchy coating for the tofu, I set up a breading station:  seasoned flour, seasoned Ener-g Egg Replacer and seasoned panko bread crumbs.  I seasoned the flour and the bread crumbs with garlic powder, paprika, cayenne, salt and pepper.  I seasoned the egg replacer with vegan "chicken" flavored seasoning, salt and pepper.  For the red sauce, I purchased a bottle of Louisiana Hot Sauce, heated it and seasoned it with garlic powder and Earth Balance Buttery Sticks.

For the tofu, I pressed firm tofu in a TofuXpress for 2 hours and patted it dry with a paper towel.  I cut the tofu into 2x2" squares, dredged the pieces in flour, egg replacer and panko, and then deep-fried them at 350 degrees until golden brown.  I then tossed them with the spicy red sauce and served them immediately, along with the ranch dressing, celery and carrot sticks.

Thursday, August 25, 2011

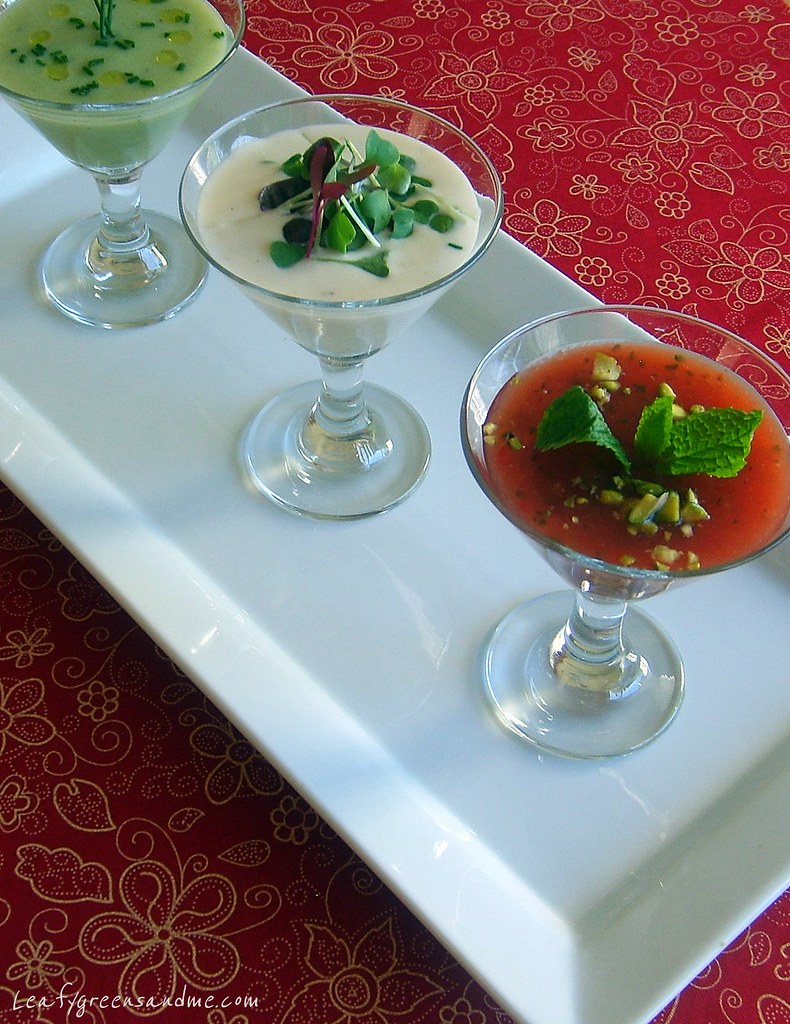
Gazpacho Trio Tasting

Well I finally broke down and made my husband watermelon gazpacho, along with two other flavors--a creamy almond and tangy tomatillo.  Nothing reminds me more of Spain, than gazpacho.  It's a perfect soup for a warm summer evening and it takes me back to Andalucia every time I make it.  This trio would be fun to serve in shot glasses as an appetizer before the main course, or they can be served accompanied by rustic country bread and of course a good Spanish wine.  If I were entertaining, I would serve this trio with saffron marinated olives, marcona almonds, assorted roasted vegetables with romesco sauce, and potato-olive empanadas with a fig-pear dipping sauce.  Sounds delicious doesn't it!  By the way, I'll be posting all of these recipes shorty in case you ever want to throw a Spanish party of your own!


What's great about making gazpacho is that all you need is a food processor or a blender.  Also these recipes are just guidelines for you to follow.  The watermelon that I purchased may be sweeter than yours, or the tomatillos that you purchase maybe really sour so you'll need to adjust the flavorings. 


Watermelon Gazpacho:

3-4 cups diced seedless watermelon
2 large ripe tomatoes, chopped, about 1 1/2 cups
1 1/2 cups diced English cucumber
1/2 cup diced red bell pepper
1/4 cup chopped red onion
1/4 cup fresh mint leaves
Juice of 1 lime or to taste
Kosher salt to taste
1/4 cup chopped pistachios 
Mint leaves for garnish

Method:
  • Add all ingredients to a food processor and blend until smooth.  Chill for about 3 hours for flavors to combine.
Tangy Tomatillo Gazpacho:

1 pound tomatillos, husk removed, blanched for about 15 seconds, and chopped
2 cups diced English cucumber
1 Anaheim pepper, seeded and diced
1 avocado, peeled and diced
2 cups sourdough bread, crust removed, diced, soaked and drained
1 garlic clove, minced
1/2 tsp serrano pepper, seeded and minced (or more to taste)
1 tsp cumin powder
1 tbsp aged sherry vinegar
2-3 tbsp extra virgin olive oil, preferably Spanish
Kosher salt and black pepper to taste
Chopped chives and olive oil  for garnish

Method:
  • Cover bread with filtered water for about 10 minutes to soften.  Drain and squeeze dry.
  • Add all ingredients to a food processor or blender and blend until smooth.
  • Strain and season with salt and pepper to taste.
  • Chill for about 3 hours for flavors to combine.
Creamy Almond Gazpacho:

1 cup whole almonds, blanched for about 20 seconds, skins removed
2 1/2 cups sourdough bread, crust removed, diced, soaked and drained
1-2 garlic cloves, minced
1 1/2 cups filtered water
1-2 tbsp aged sherry vinegar
1/4 cup extra virgin olive oil, preferably Spanish
Kosher salt and black pepper to taste
1 red or black plum, pitted and diced small for garnish
Micro greens or chervil leaves for garnish

Method:
  • Blanch almonds in boiling water for about 20 seconds, drain and remove skins.  Add to a food processor and blend until fine.
  • While preparing almonds, soak bread for about 10 minutes until soft.  Drain and squeeze out excess moisture.
  • Add all ingredients to the food processor and blend until smooth.
  • Season with salt and pepper to taste and chill for about three hours before serving.



ShareThis